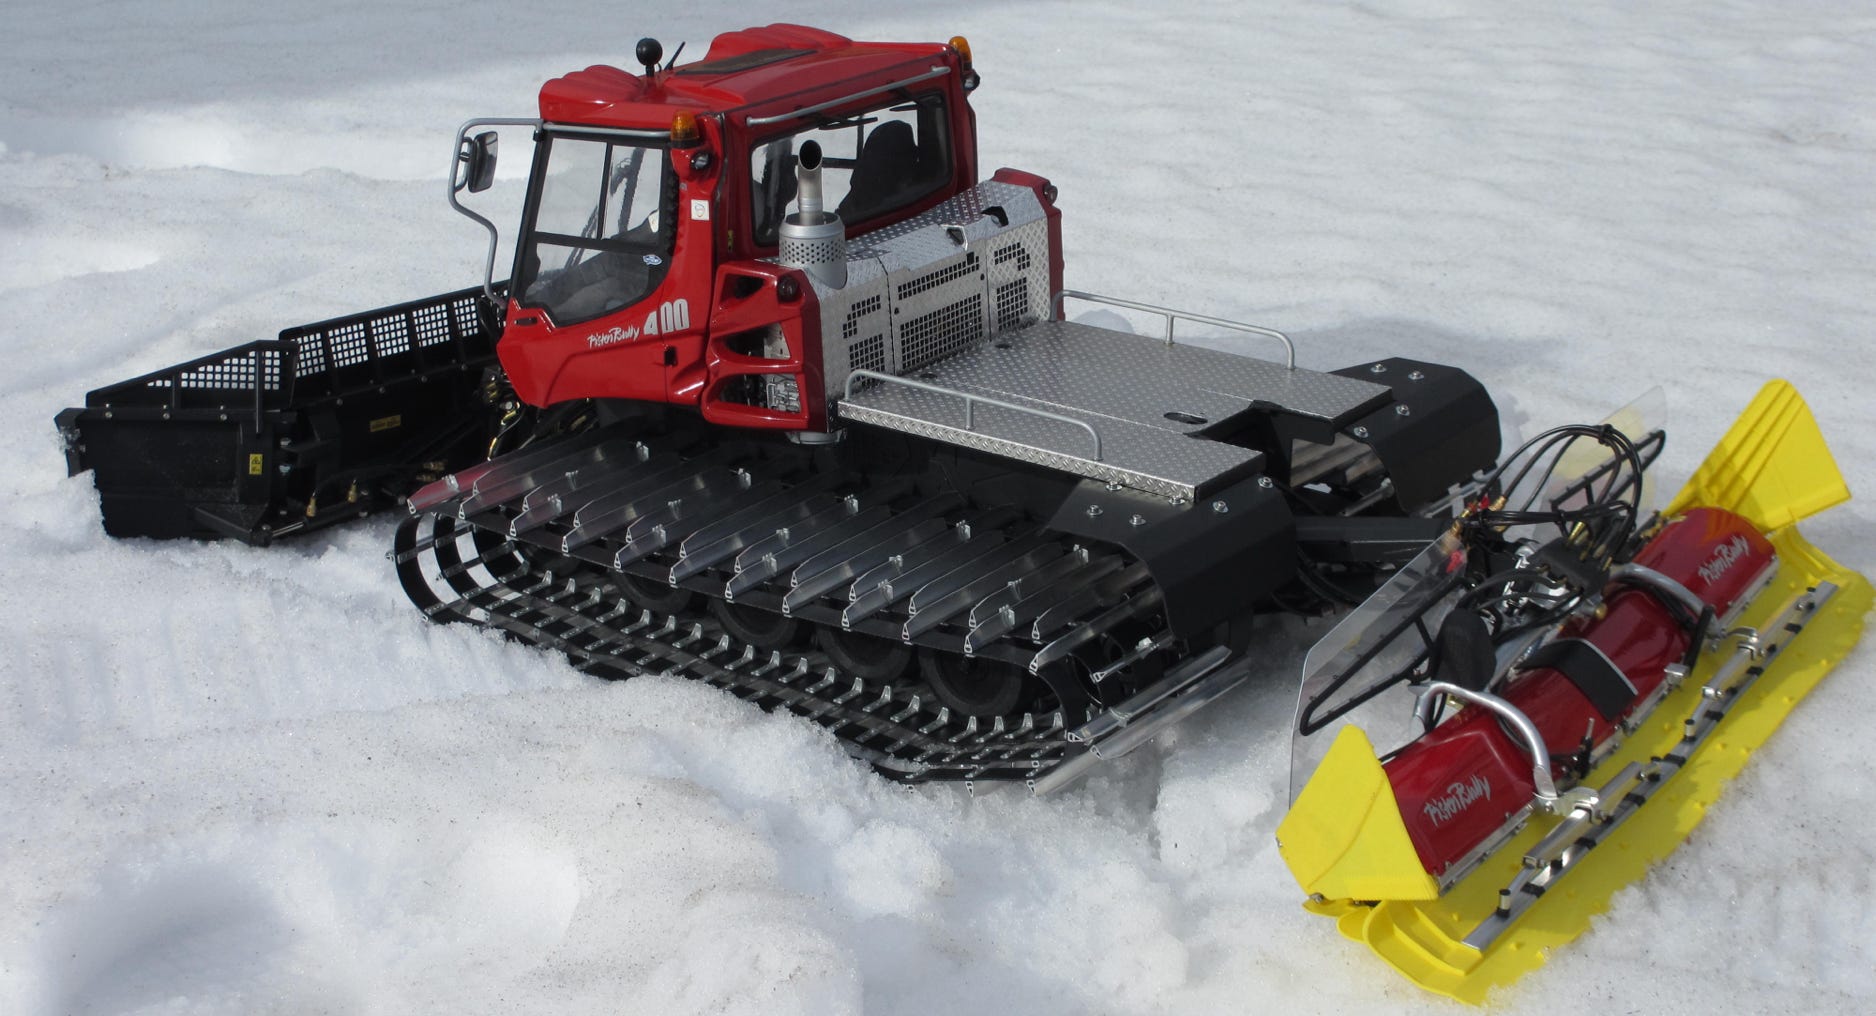
Walser Pistenraupen Modellbau
I developed the PB400 kit already in the winter of 2009/10. In early 2013 it was about time that I'm making a such a model for myself. For the base I did of course chose the Pistenking chassis.
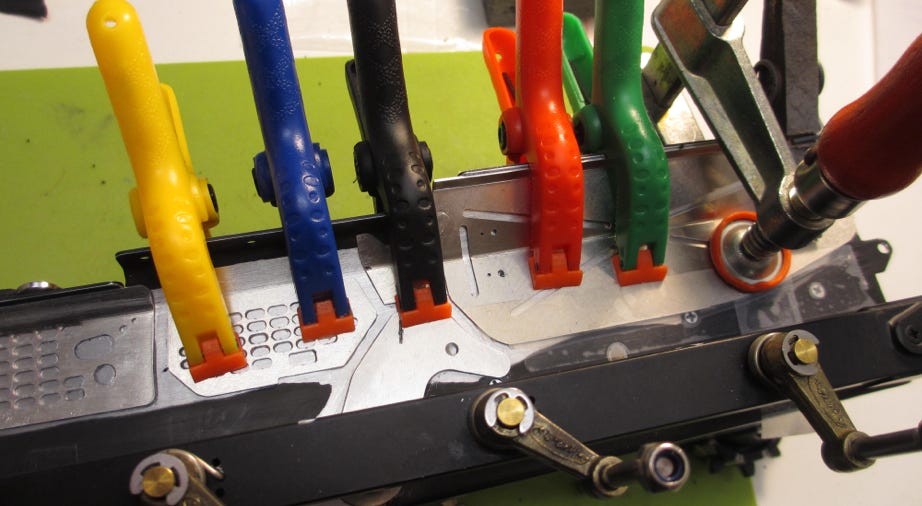
All auxiliaries are operated with hydraulics, and for the snow blade all 12 movements are possible. Building the snow blade and the tiller with super detailing is described here in detail.
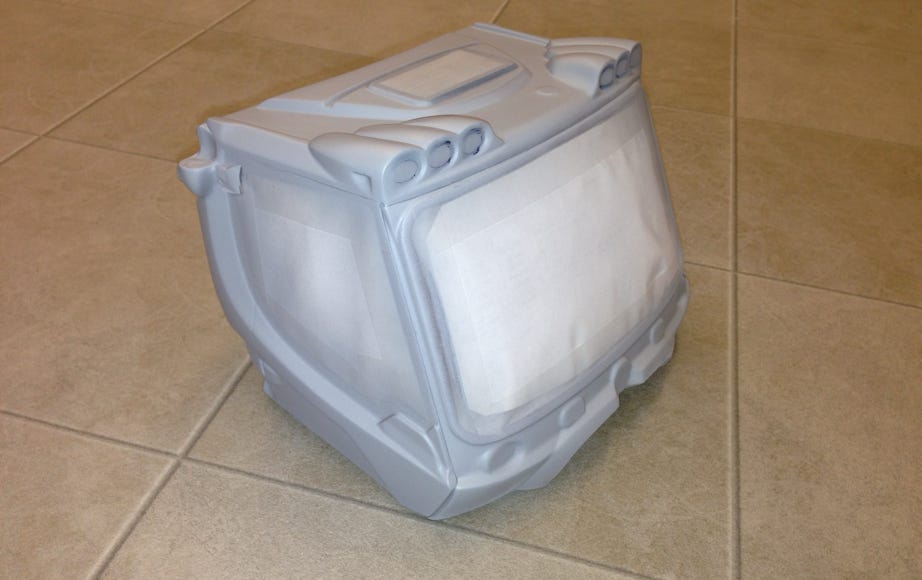
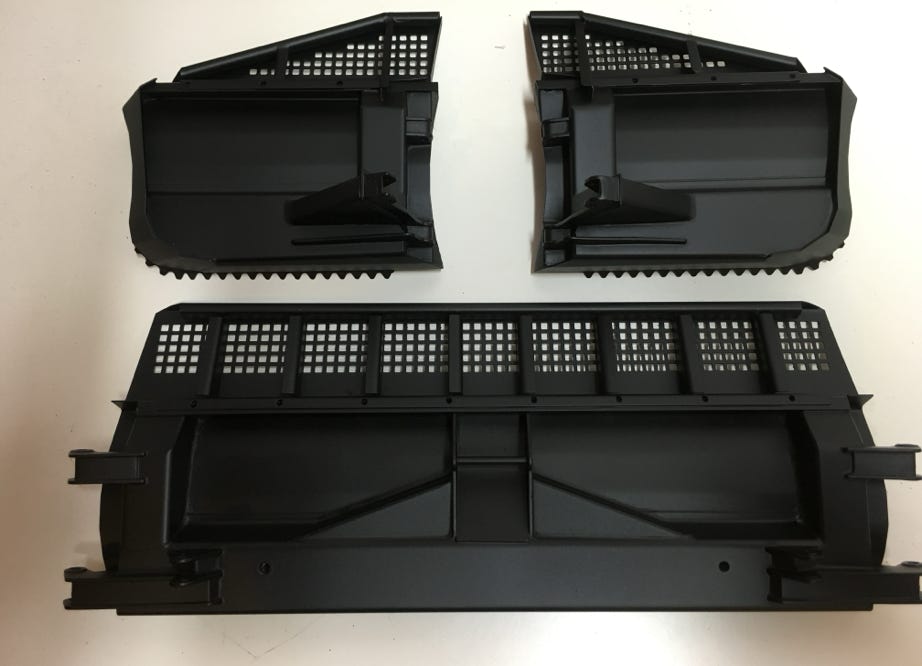
The body consists of vacuum formed parts which need to be cut to fit and glued together. I put the reflectors for the lights in place before glueing, that makes it easier.
How the body is assembled can be read in the detailed building instructions by AT modellbau. Therefore I don’t need to explain these steps here.
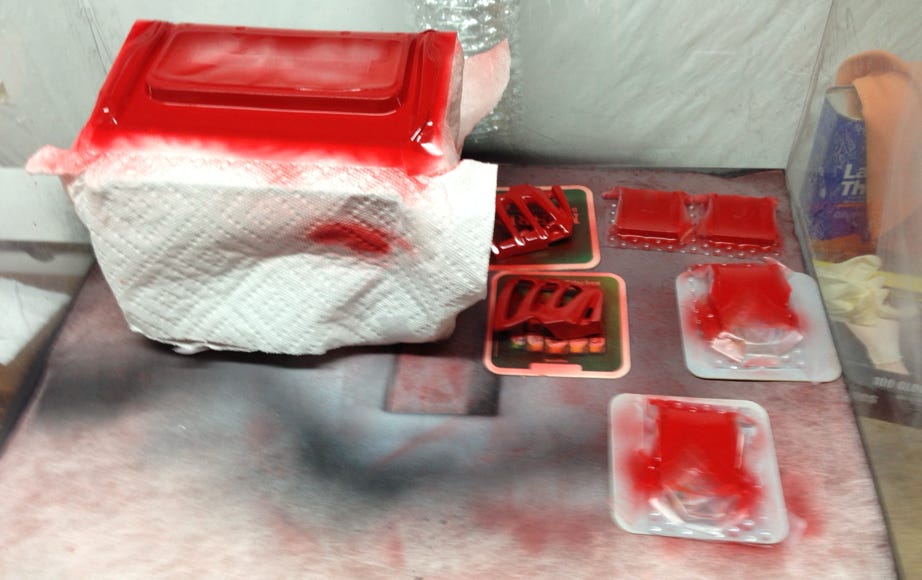
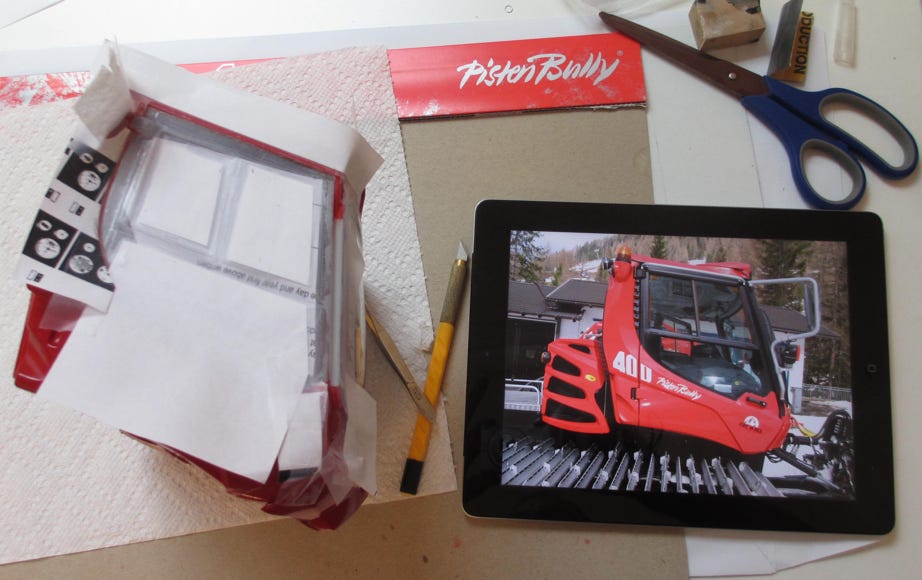
For painting with an airbrush the windows have to be masked carefully (picture to the right).
The PB400 is here still in an early phase of building. The driver cabin is being painted.
First a gray primer is applied to get the correct interior color, followed by several layers of red. I am using Humbrol 220 (Ferrari red) and an airbrush.
To achieve a truly scale model continuous comparing with pictures of the original is a must, especially when masking the black door and window frames.
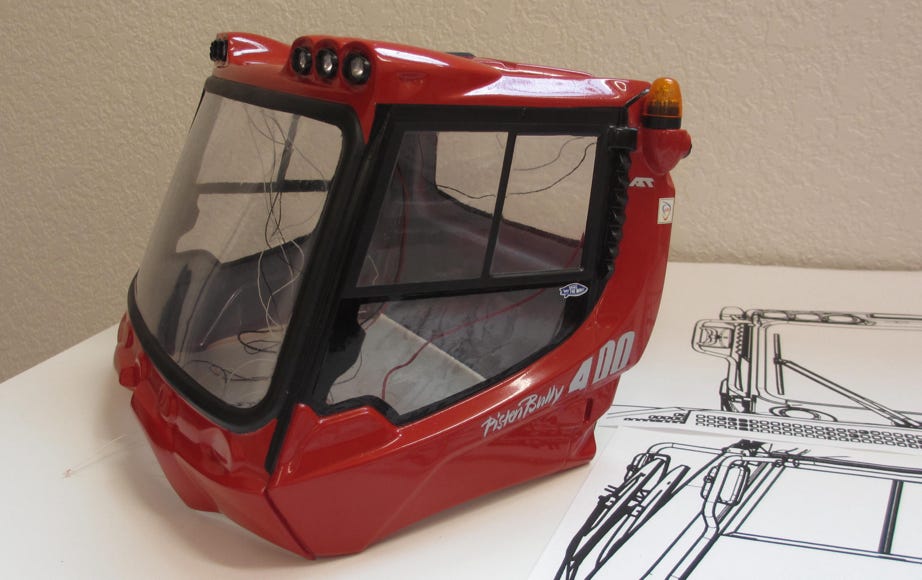
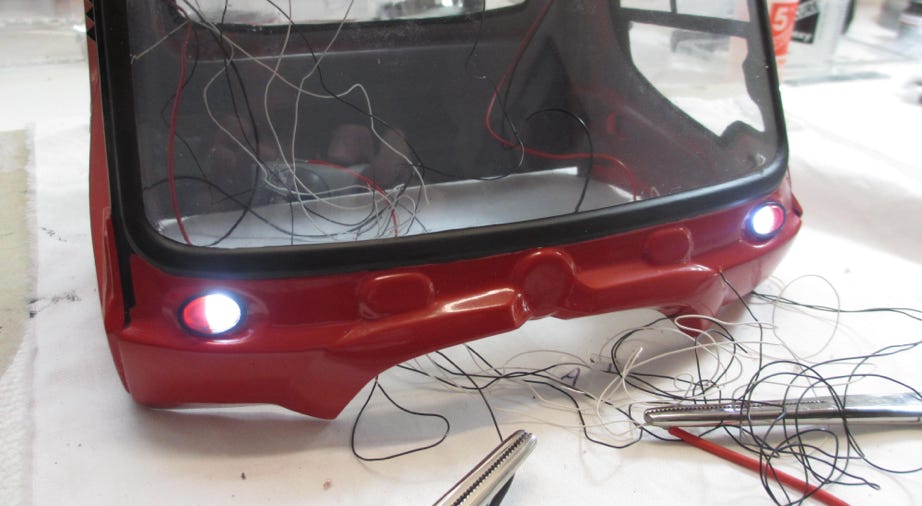
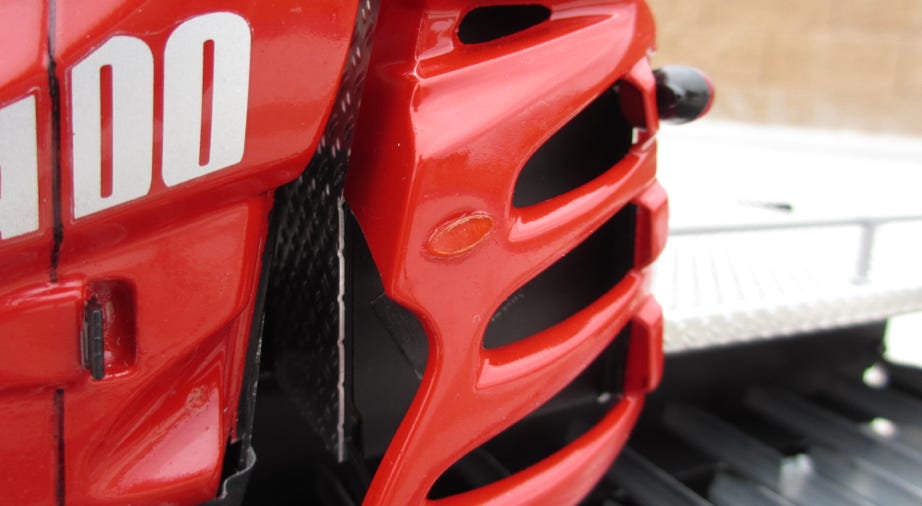
The paint work of the driver cabin is finished and the black frames of the headlights have been attached.
The door frames and a-column have been airbrushed in satin black, the frames around the sliding window in flat black to match the variation in shade as seen on the photos.
The rubber around the windscreen and the back window have been painted by hand to simulate the uneven shades of rubber. For rubber I use a mixture of flat and semigloss black, with some brown.
Lights
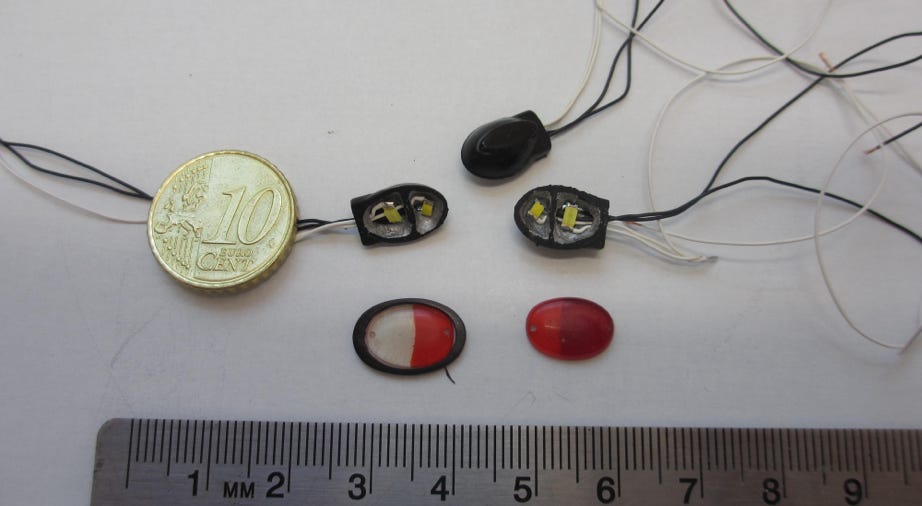
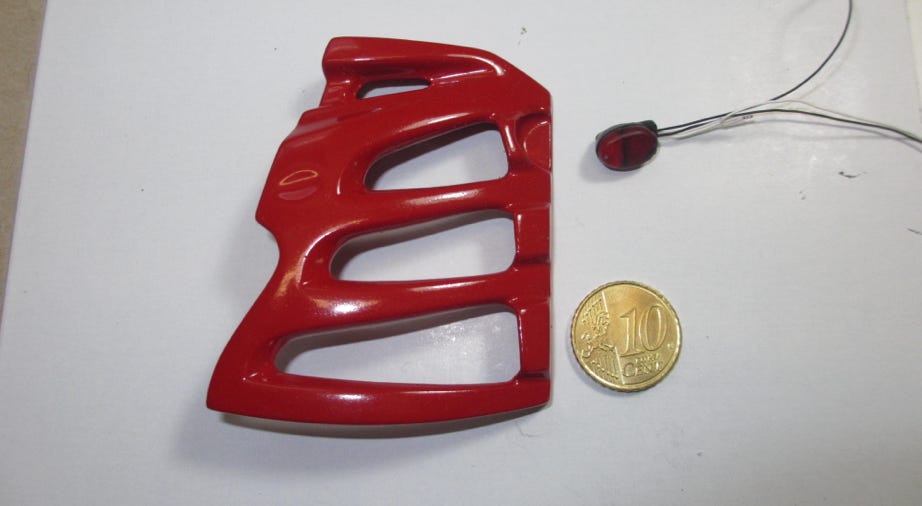
Both combination lights for the front running light & turn signal, as well as the rear light & turn signal have been made according to the original, and of course functional. Micro-LEDs (SMD) were used.
The lamp cases and lenses have been made by myself especially for the PB400. The mold was replicated using a silicone mold and casting with resin. How this is done is described in detail under Know How.
Soldering of the SMD was easier than anticipated.
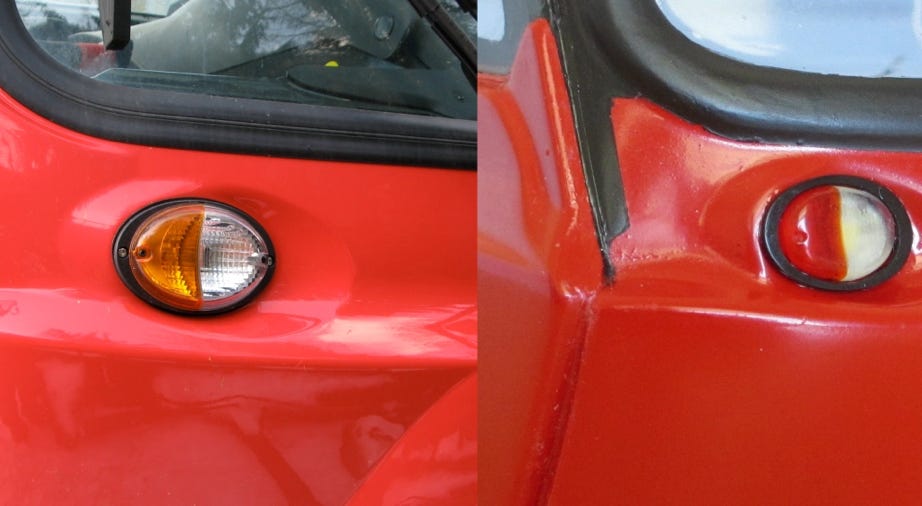
Comparison of the combination lights: left: original, right: model
Rear combination light
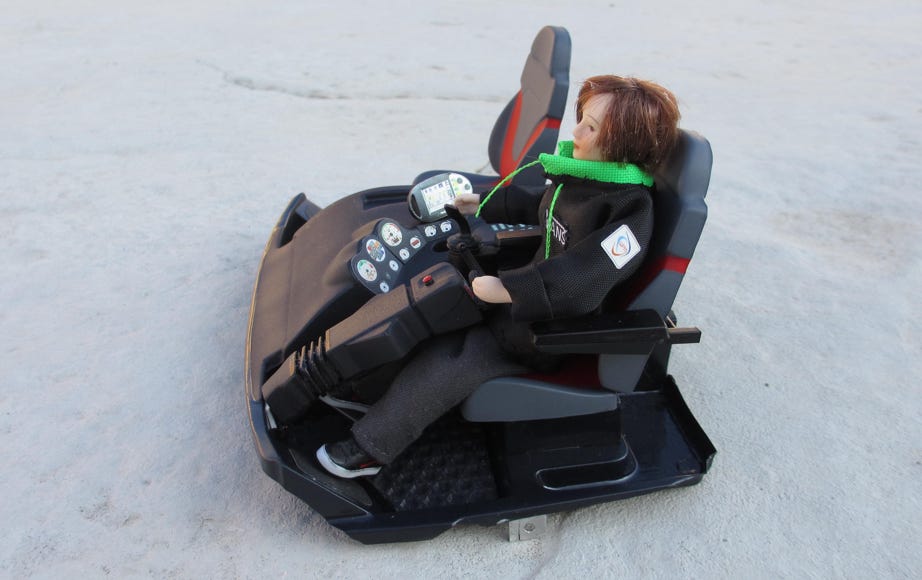
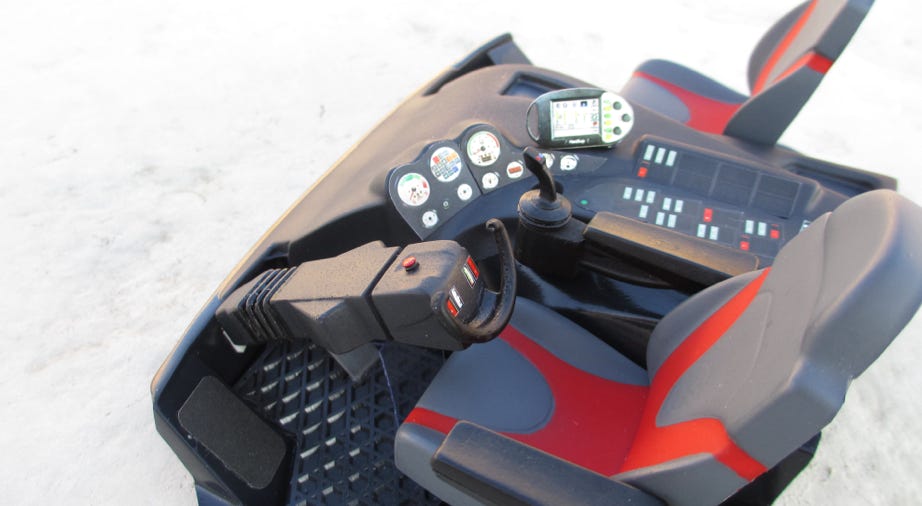
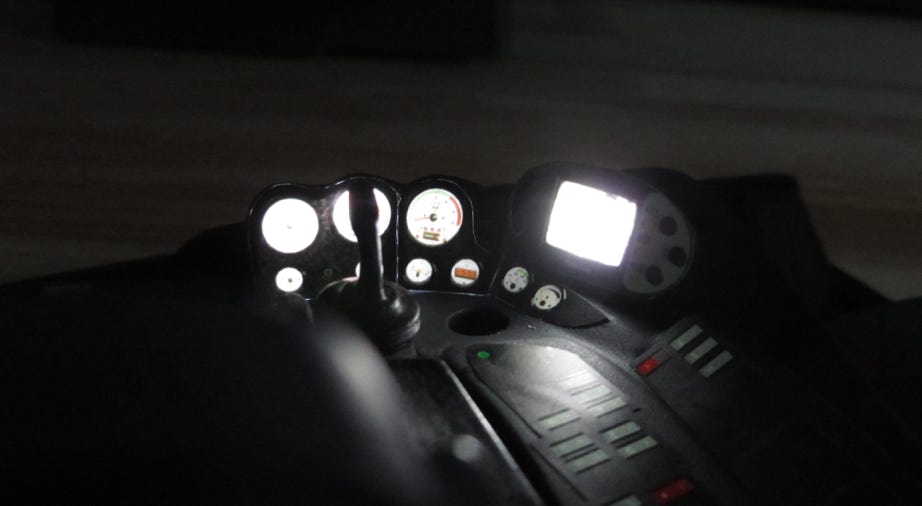
Cockpit
Our new snow cat driver makes himself comfortable in the cockpit.
The instruments are of course lighted for working at night. The
screen got a micro LED, the round instruments are lighted by a 3 mm LED, which is installed in a housing.

A close up look to the beautiful Pistenking metal tracks
Chassis
The chassis is made really fast with Pistenking's kit, all parts fit perfectly. Also the tracks have been a new experience for, it was almost indecent how fast they were screwed together. Especially in comparison to the 3 tracks I did before.
The maiden drive was made on Jan. 11, 2014.
Of course all lights are switchable.
Maiden drive on Jan. 11, 2014
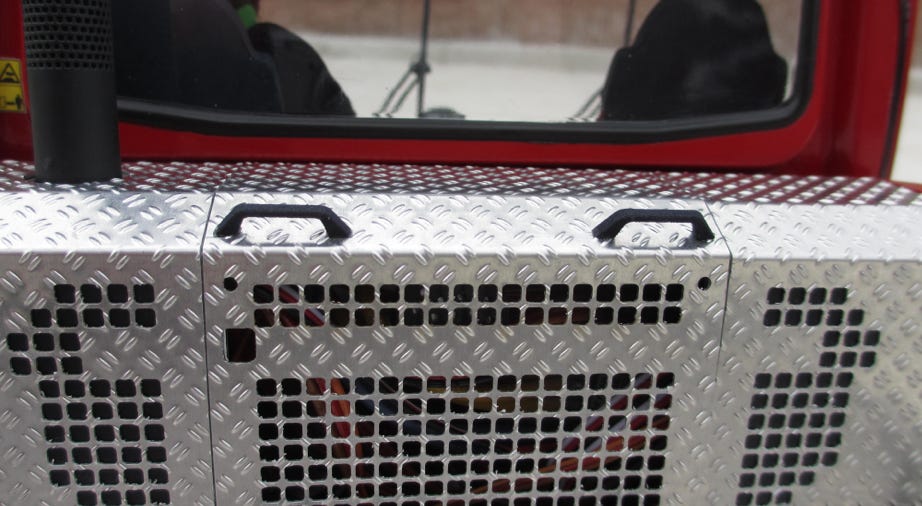
The final details have been attached to the body:
- handles on the backpack
- side reflectors on the air intakes
The handles are 3D print parts.
The side turn signals were made from an amber plastic bottle, which originally contained vitamin pills. A modeler has always his eyes open for things he might eventually use.
A back-up warning beeper by Pistenking was installed in the backpack and connected to the receiver and speed controller with a Y-cable.
Handlebars at the backpack
Side turn signals at the air intake
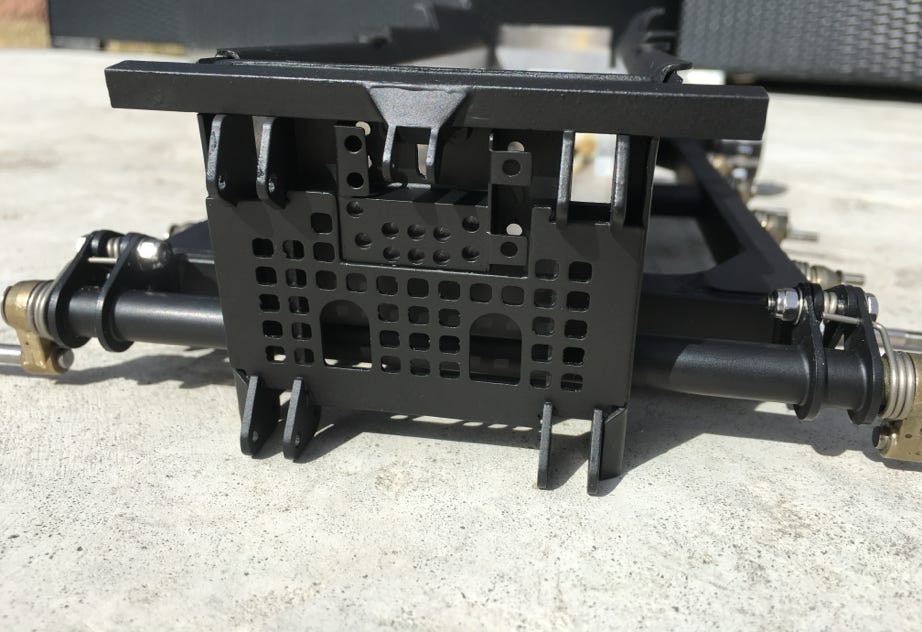
By chance I discovered the detail set by Modellbau Michael Peter which fits perfectly on the Pistenking chassis tub. It is relatively easy to install if the tub is not already painted like mine. But acetone removed the paint quickly to achieve a good surface for glueing.
Glueing the detail set sheets
Painted chassis with the detail set
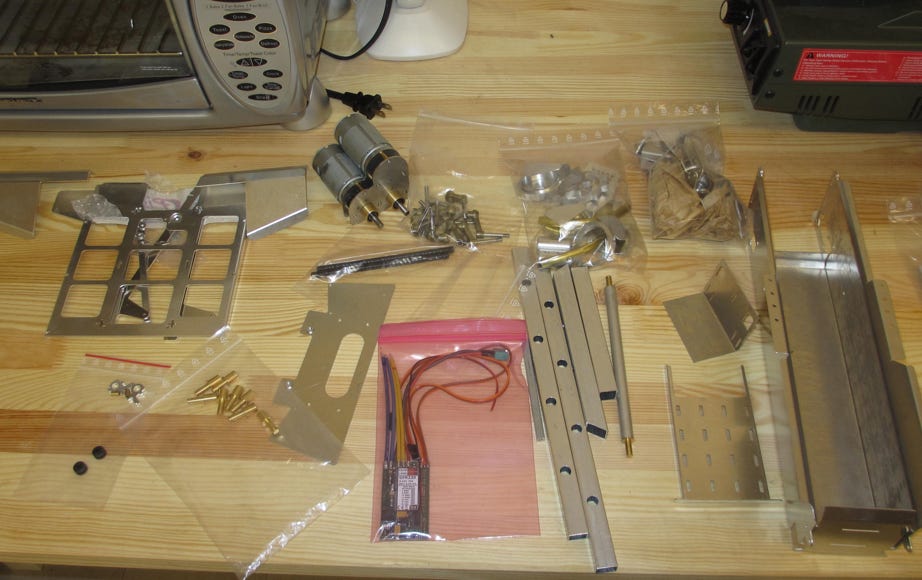
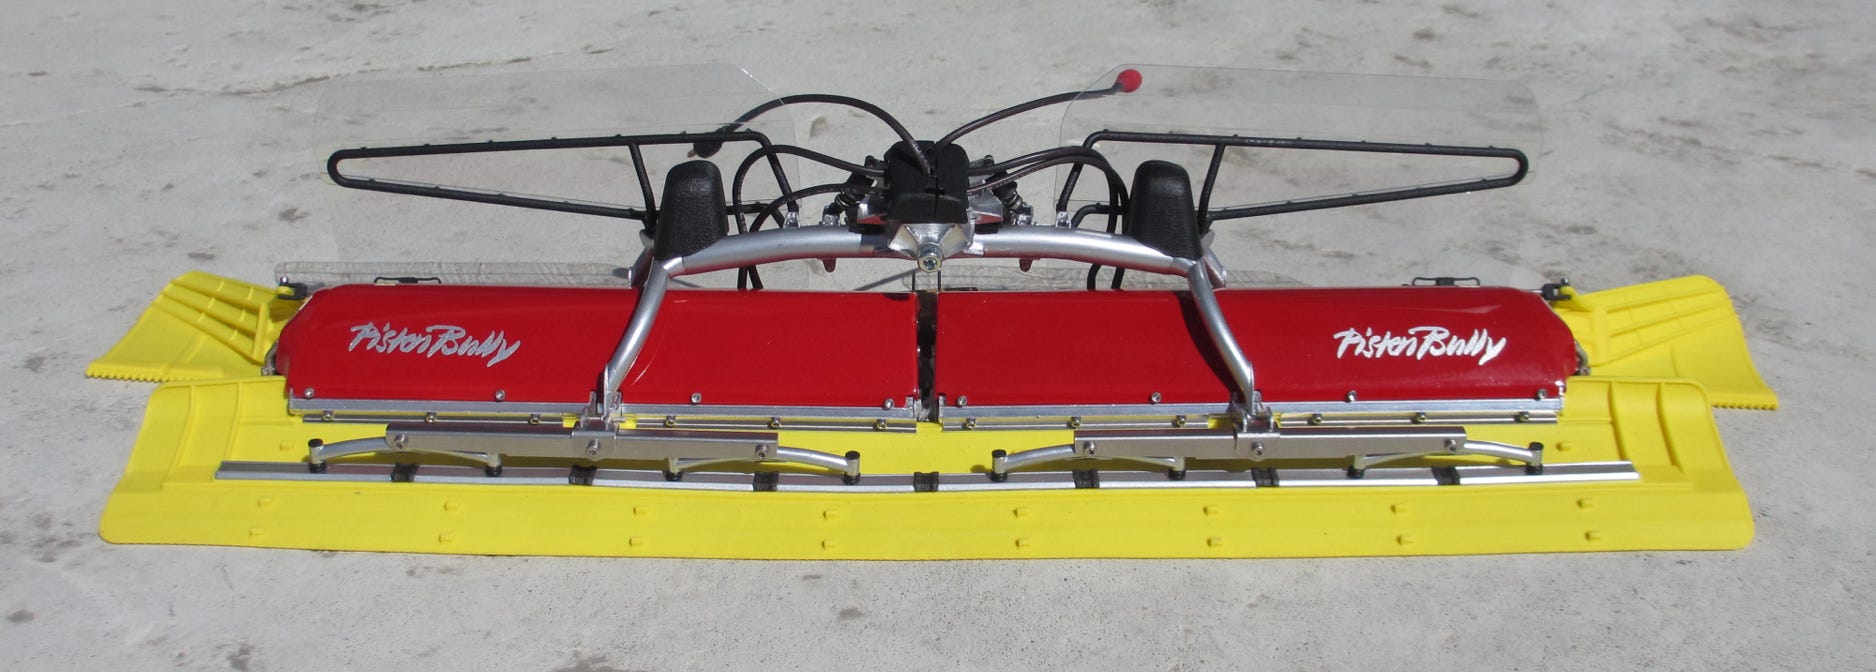
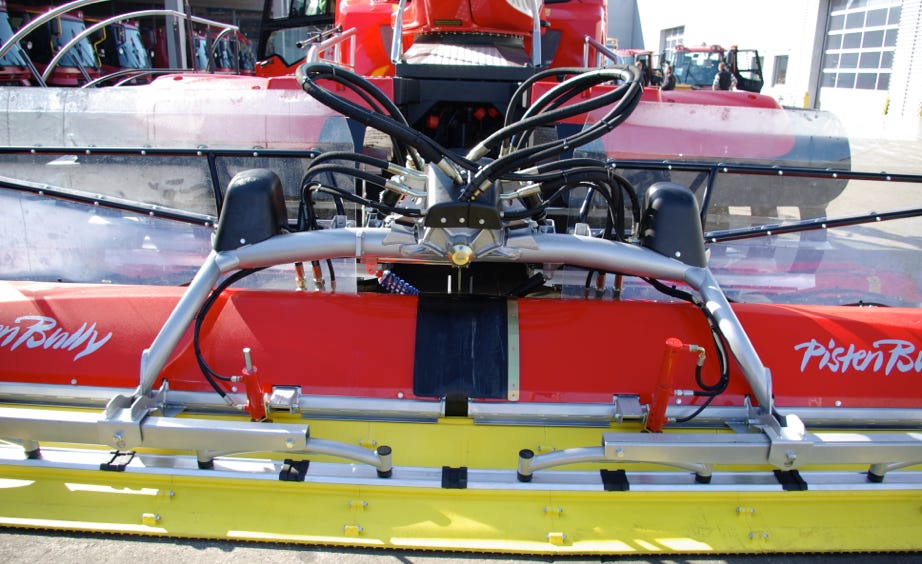
The beautiful kit by Pistenking was the only choice for the rear tiller, and the long wait was definitely worth it. More than 200 parts (not counting the screws) arrived carefully packed in transparent bags:
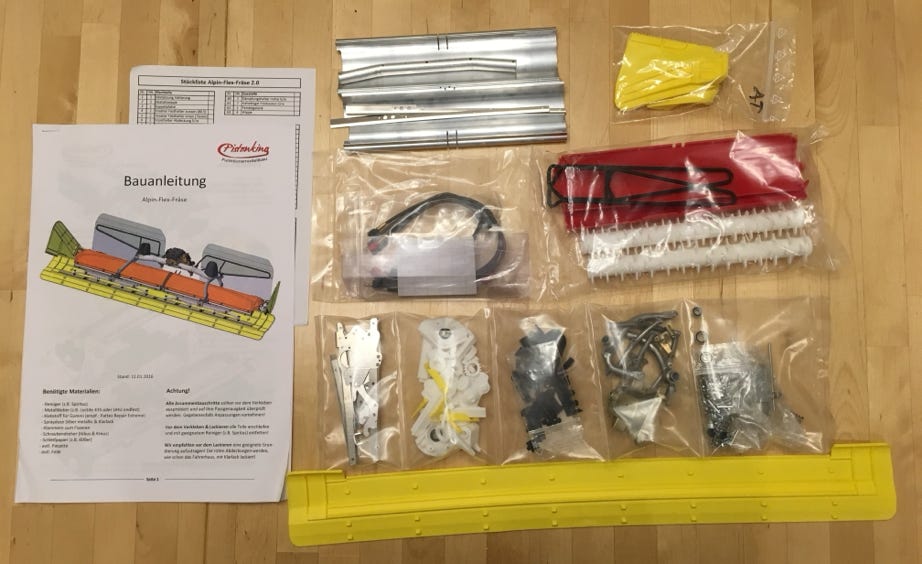
The kit consists of 3D printed parts, casted metal parts, lasered aluminum parts and the injection molded red covers. Also the motors for the tiller wheels are included. The eye catchers are definitely the yellow finisher and the side finishers.
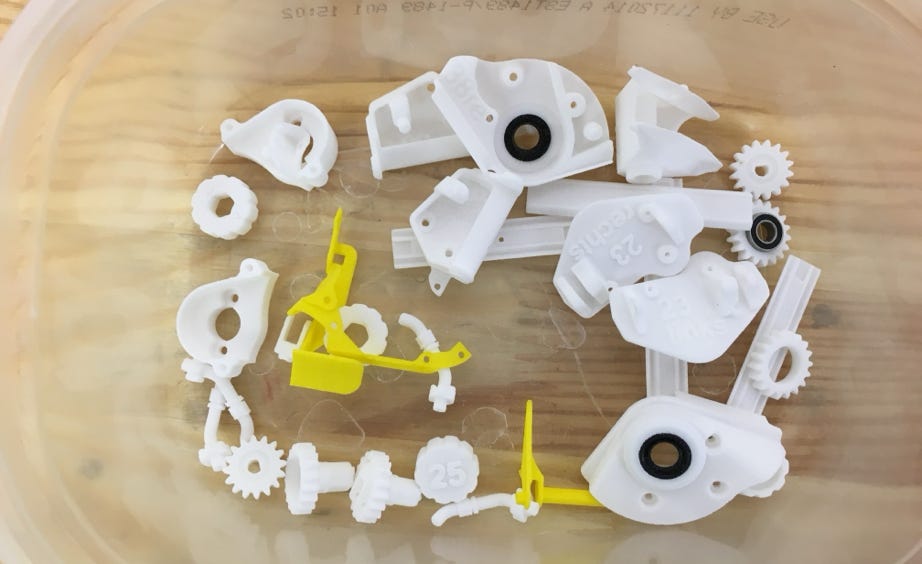
The building instruction explains the assembly with clear drawings in full color. All plastic parts are numbered and cannot be mounted wrong due to cleverly arranged positioning pivots.
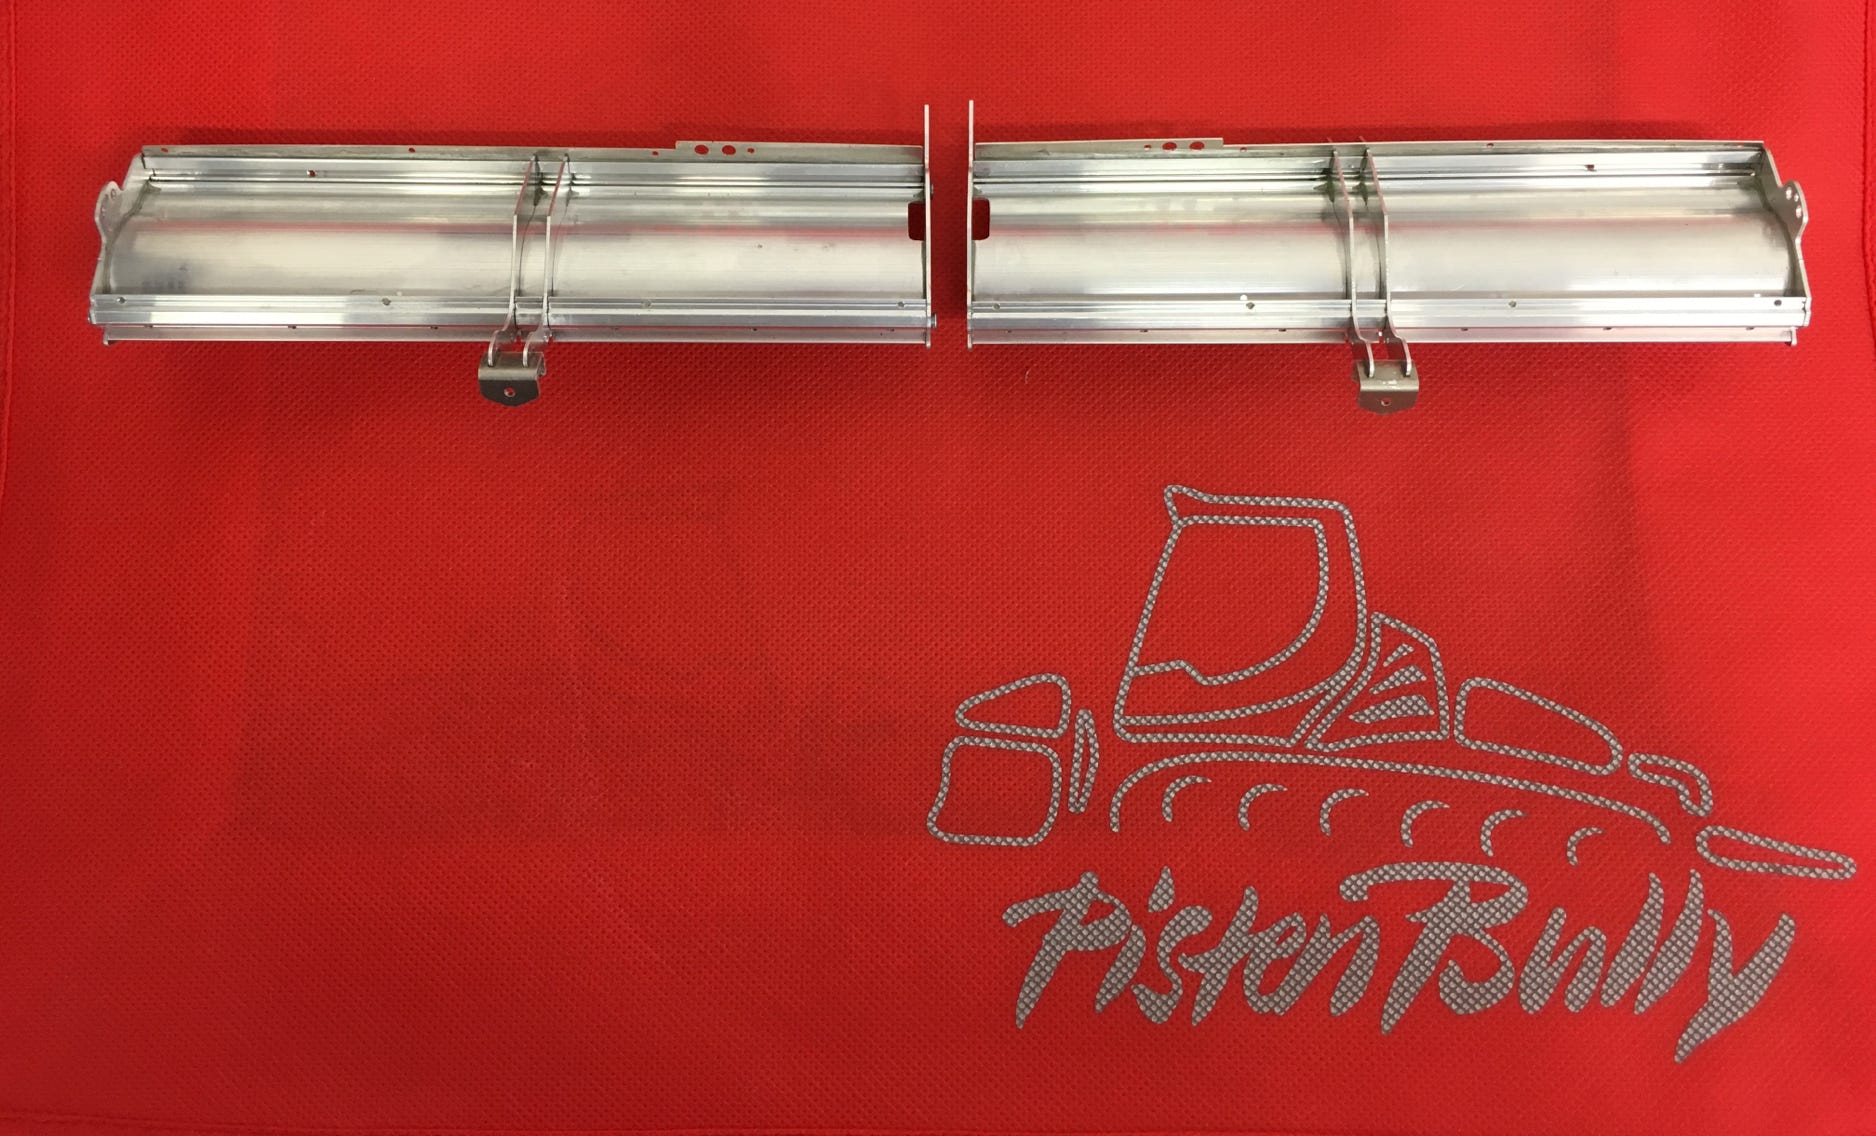
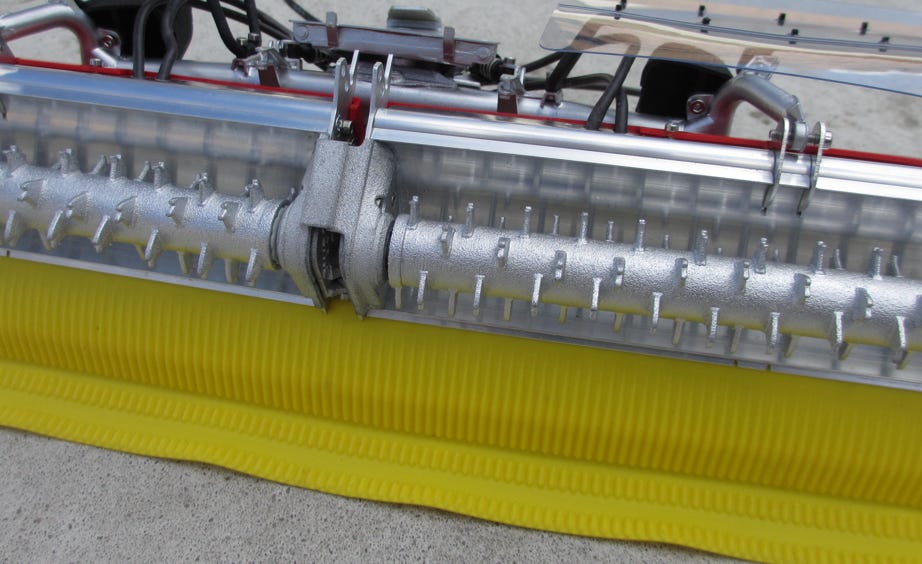
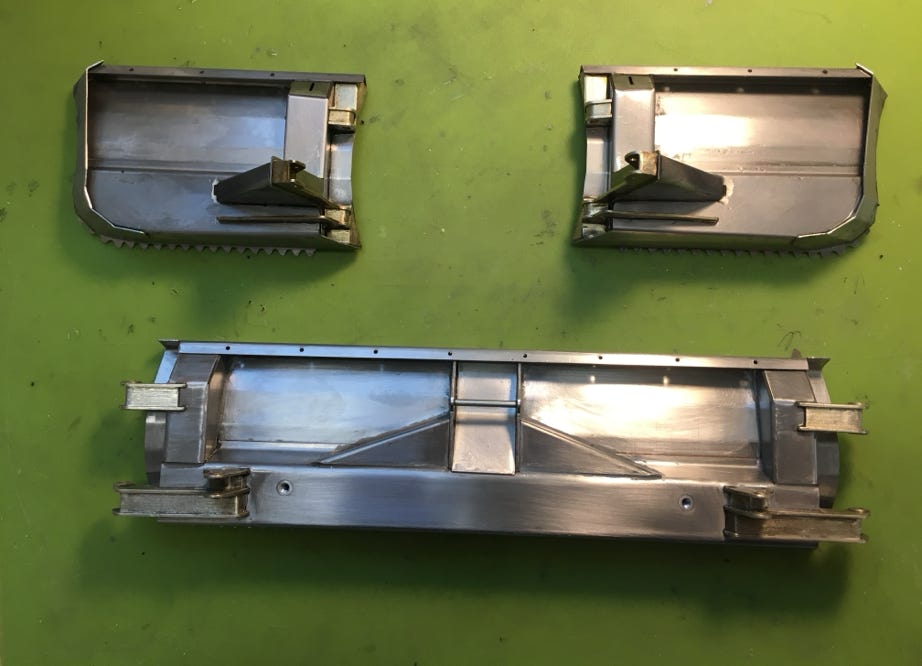
Both tiller housings consist of a special made aluminum casting profile in which the slots for mounting the finisher brackets are already milled. These are hold in the correct position by small metal pins. Anyhow all glue connections are also mechanically secured, mostly by srews. The tiller housings are connected by a joint like the original.
A disadvantage of the sinter printed parts is the grainy surface. Therefore I smoothened all visible parts with spray filler and sanding paper. Each of the two tiller wheels is a 3D printed plastic part. They are made of tough nylon and should resist the normal usage of the model. Anyway nobody would get the idea to grind an icy slope with his model.
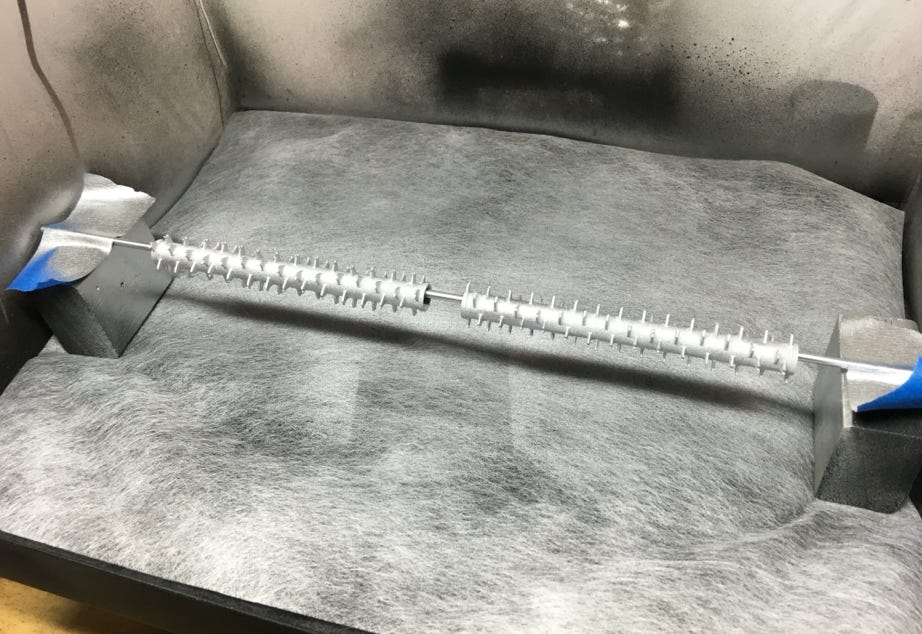
Prepping the 3D parts with spray filler
Painting of the tiller wheel in silver
Only a few parts need to be glued together. I like to work with UHU plus endfest 300 because it offers enough time to position the components. And it hardens in the oven in only 5 minutes at 180°C and gets almost as strong as a soldering joint. The plastic parts are of course glued at the very end at 70°C and 45 minutes in the oven.
Glueing of the plastic parts
Finest detailed metal parts
Driving the tiller wheels is a sophisticated design: the gear motors are mounted between the tiller housing and the cover and are thus protected from the snow. The tiller wheel is driven by encapsulated gears. Each part has roller bearings, as well as both ends of the tiller wheel. I smoothened the surface of the shaft of the drive gear on our lathe with a file. This reduces friction and saves the sealing.
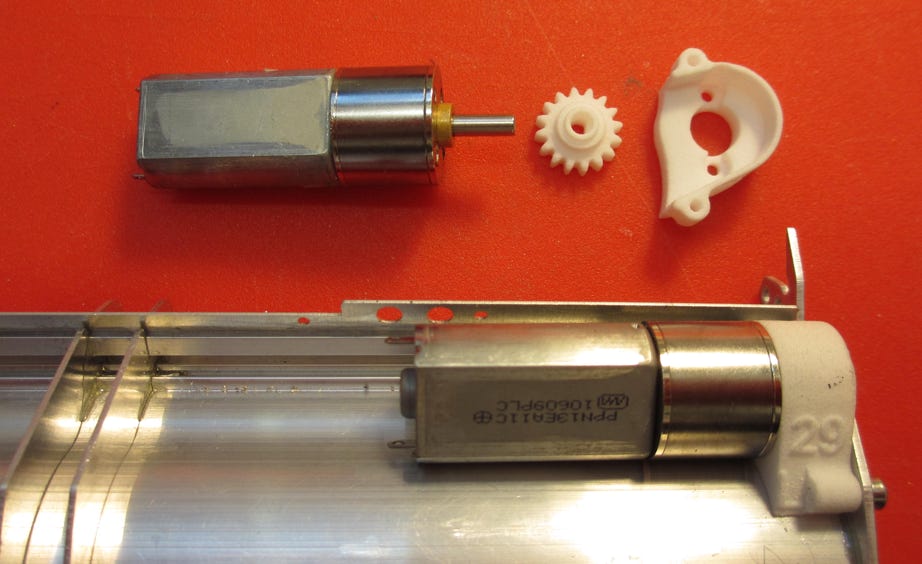
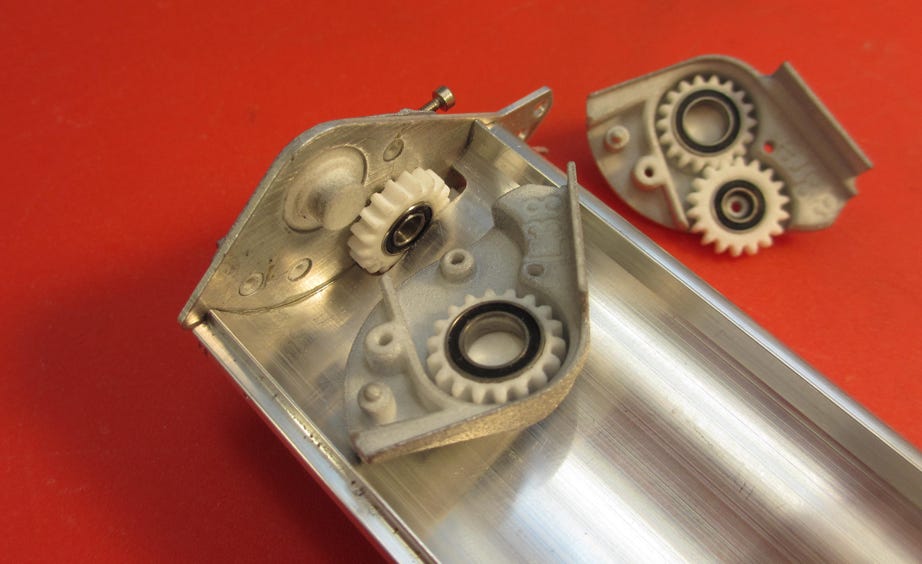
Gear motors for driving the tiller wheels
Gear box for the tiller wheel drive
The auxilliary finishers are mounted with a perfectly colored 3D printed part
Auxilliary finisher, hydraulic motor and bracket for the side finisher
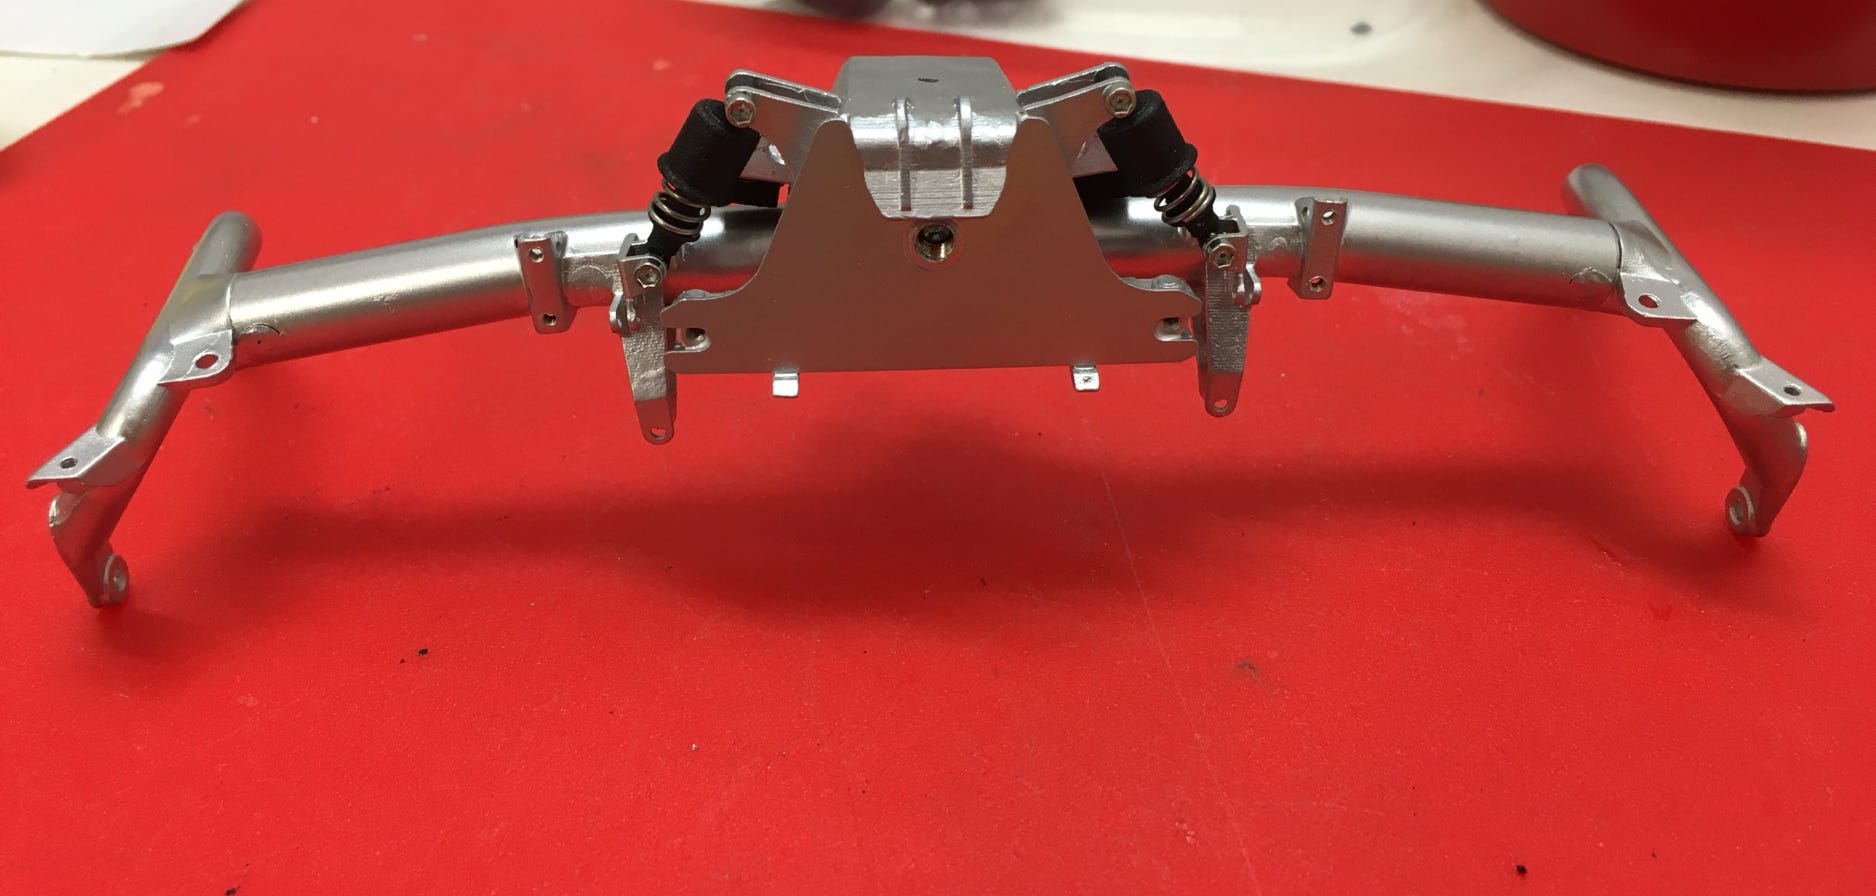
Assembled and silver painted tiller frame, the dampers are included in the kit and are functioning.
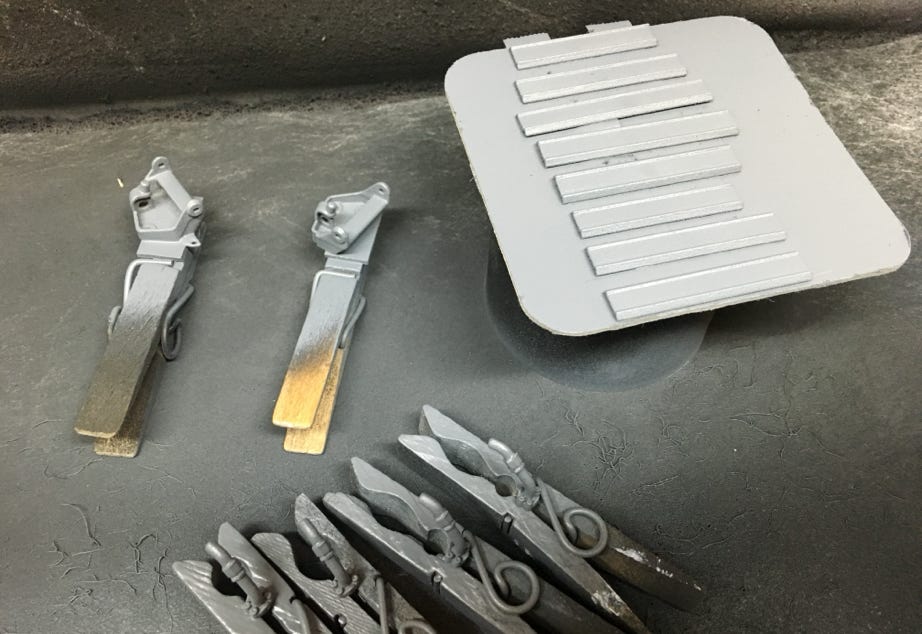
Finely detailed metal casted part for the bracket
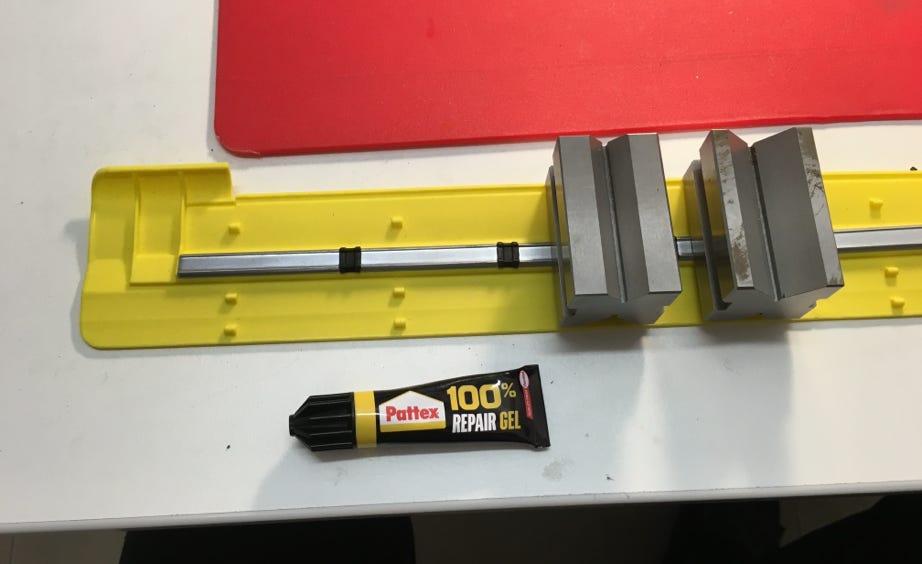
The finisher downholding strip consists of separate parts like the original, which I glued piece by piece to the finisher with Pattex.
The assembly of the tiller is done relatively quickly and can be done also by less skilled modelers.
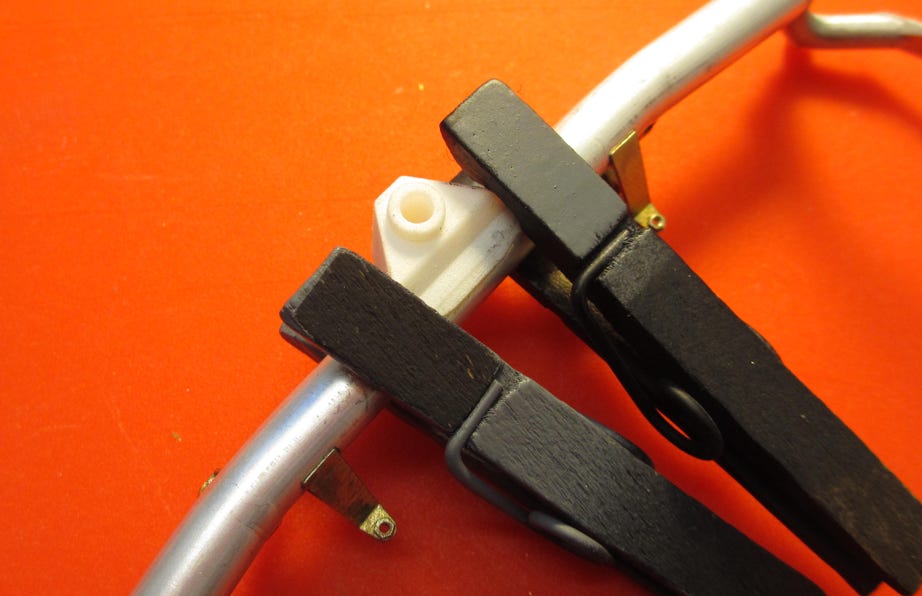
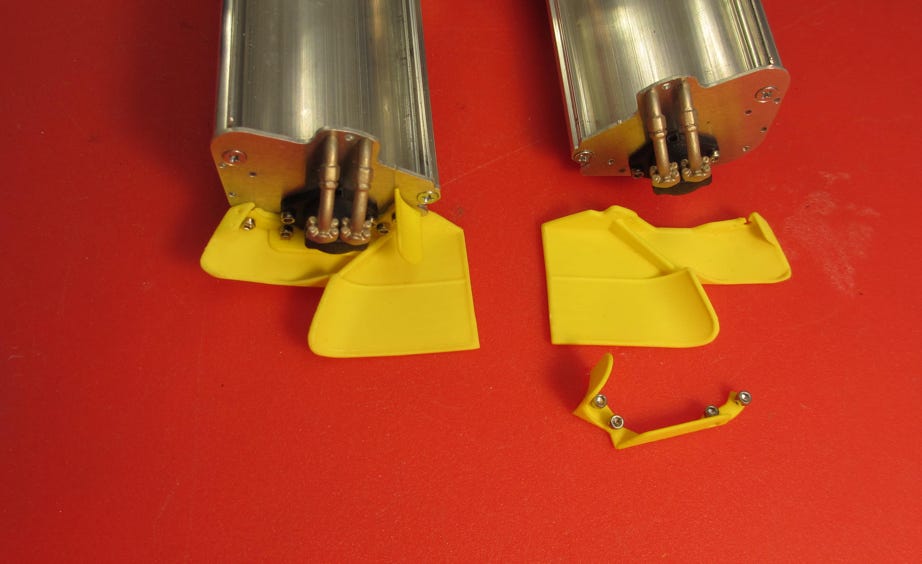
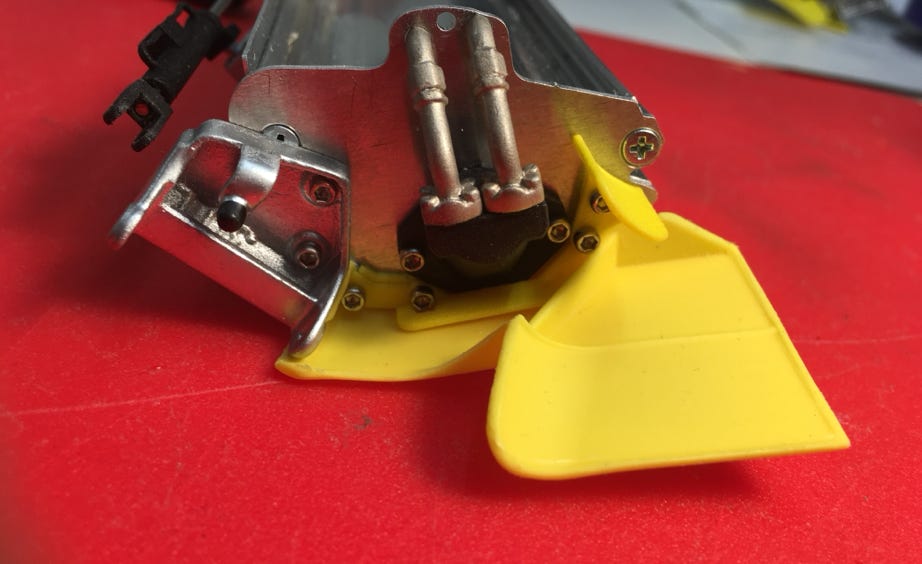
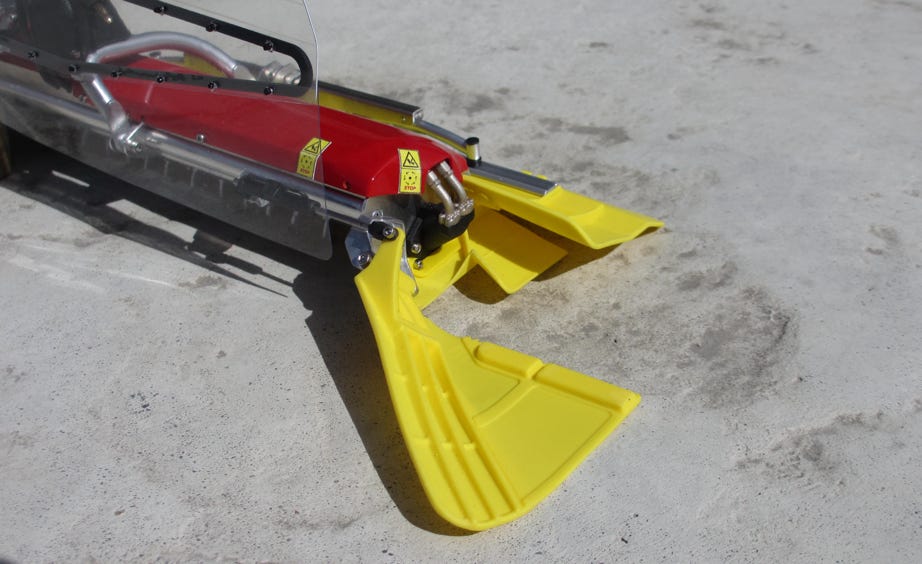
The brackets for the snow overthrow protectors are black colored printed parts. The overthrow protectors consists like the original of 2 parts: a stiff upper part and a flexible lower part. The mounting holes of the lower part are pre-cut, those of the upper part are clearly marked and can thus be drilled easily.
The side finishers can be positioned by hand. The piston rod slides in the cylinder with a slight press fit and stays put in any position. If they are to be moved radio controlled the cylinder has just to be drilled a bit wider. There is space for a linear drive under the covers. I am using hydraulic cylinders for the side finishers.
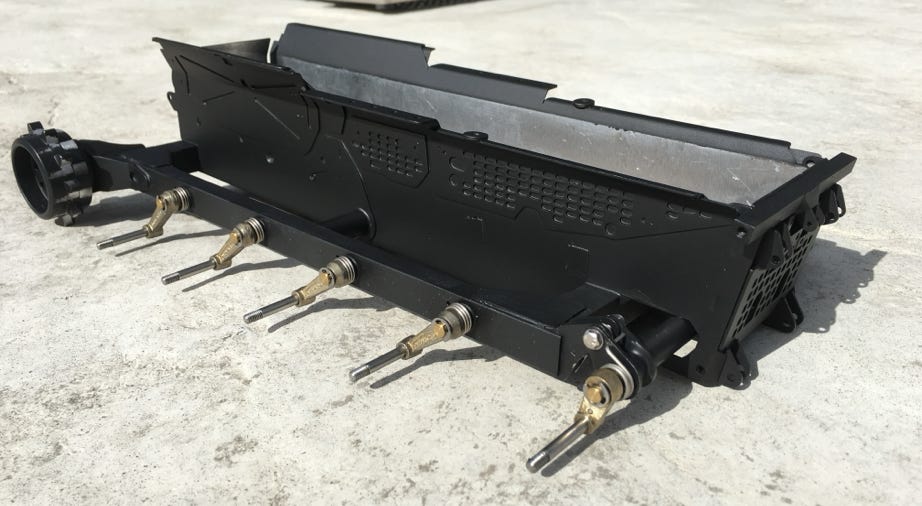
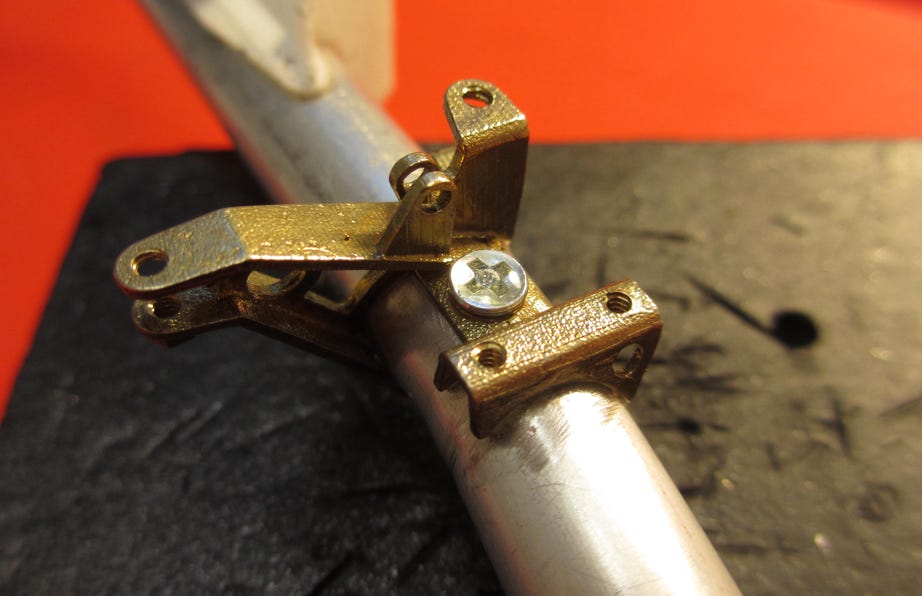
Pistenking offers the rear device carrier to attach the tiller to the chassis. It is made of solid metal parts and quickly assembled and painted black. At our kit the quick connect parts did not really match, obviously a little distortion happened at the casting process. But this was fixed quickly with the Proxxon hand tool and a small file.
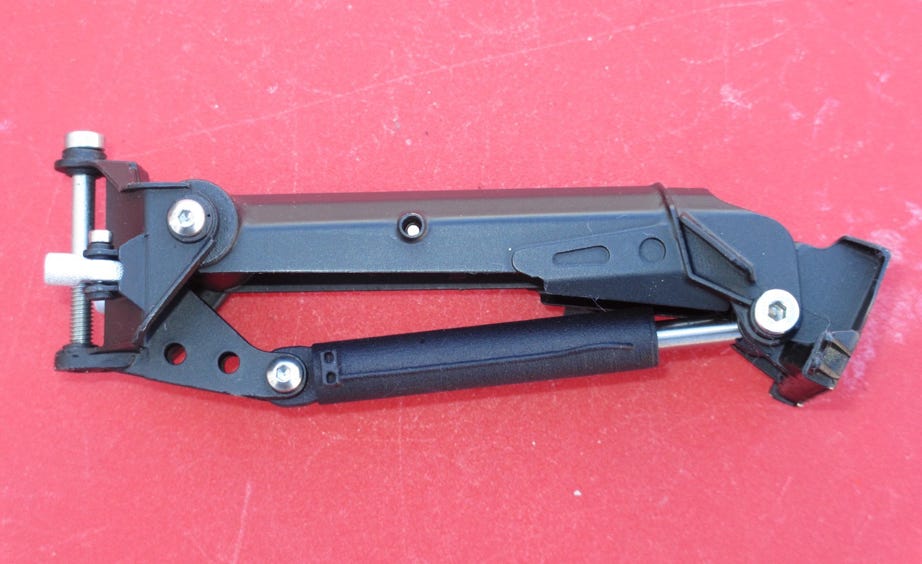
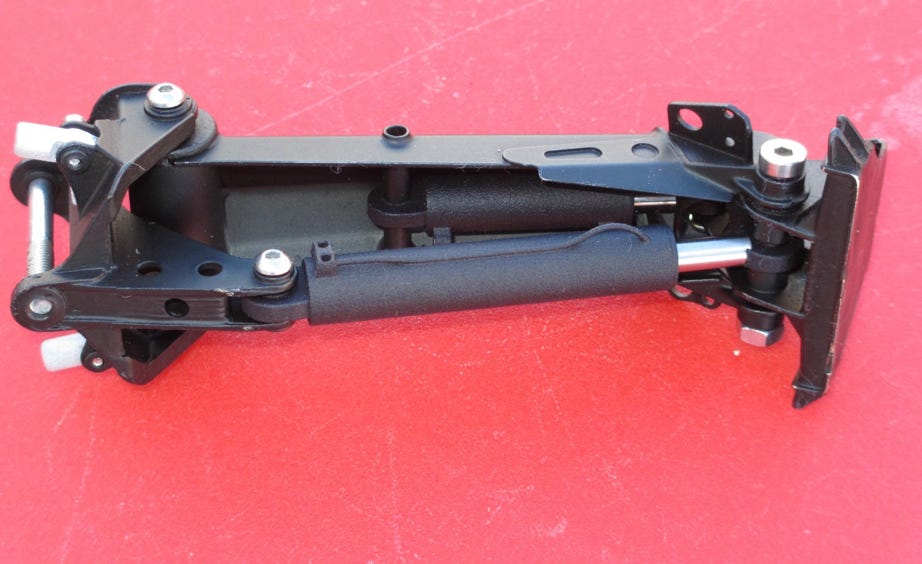
Rear device carrier
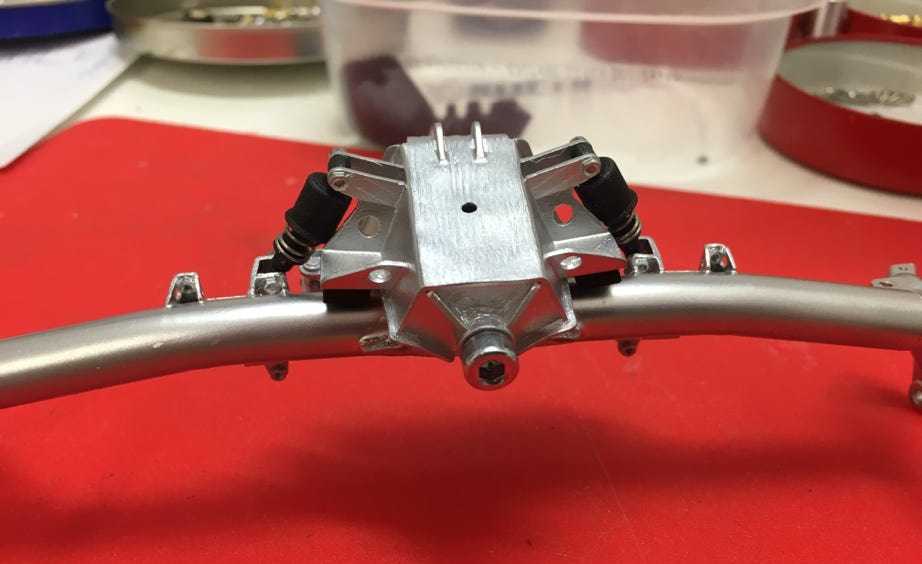
The cylinder for pressing down the tiller is also there, even as it is barely visible
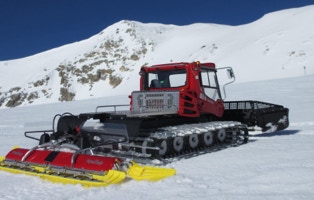
Conclusions: The AlpinFlex-Tiller by Pistenking has a high price tag, but this is more than justified for the high quality parts and rich detail. Pistenking could achieve to design the kit in such a way that this rather complex device can be assembled relatively easy and quickly.
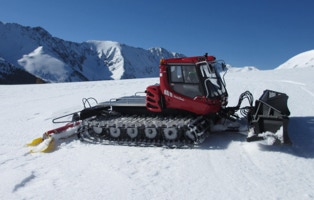
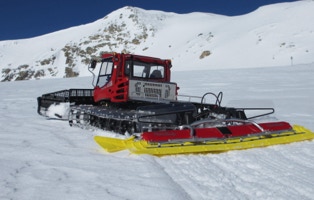
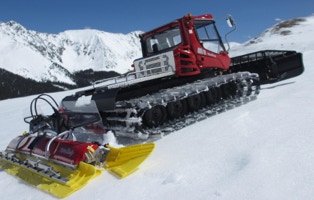
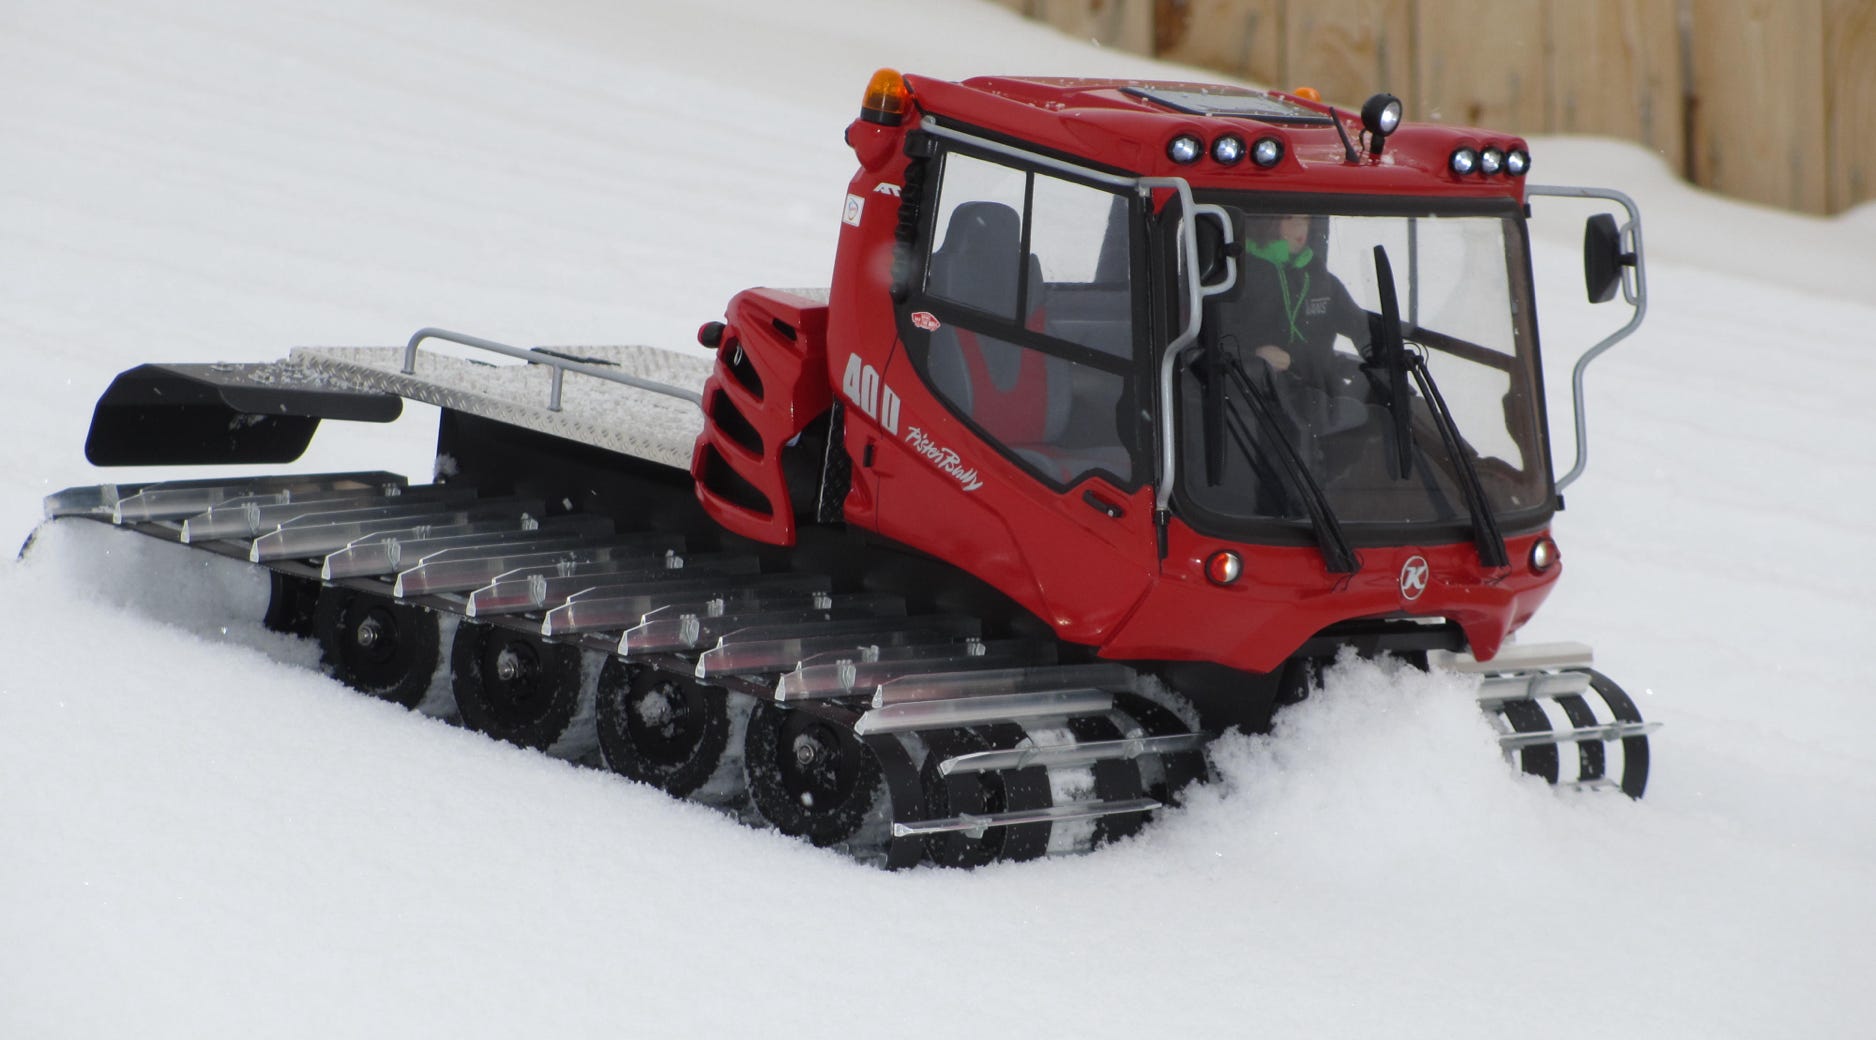
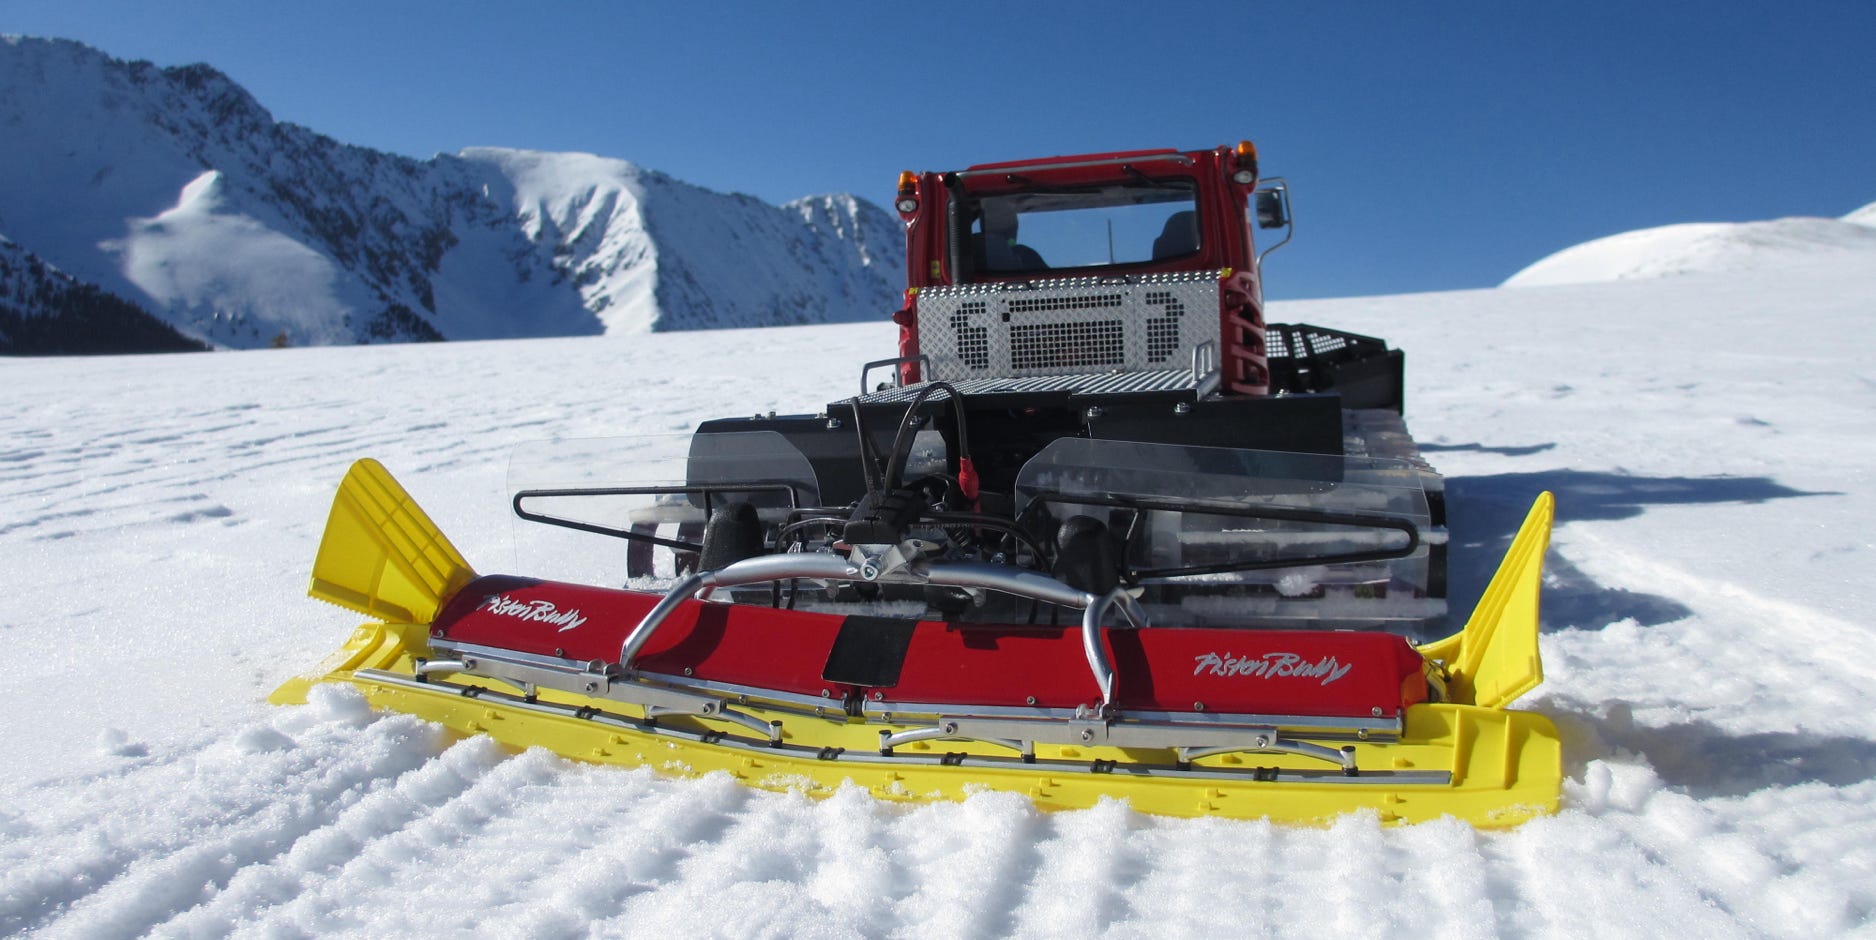
Even mid May there are still good snow conditions in Colorado for a first test run with the tiller. It not only looks awesome on our PB400, but it also fully meets our expectations. The flexibility is nothing short of the original. The finisher adapts to all slope irregularities, and with the right snow even the well known corduroy of a freshly prepared slope is possible.
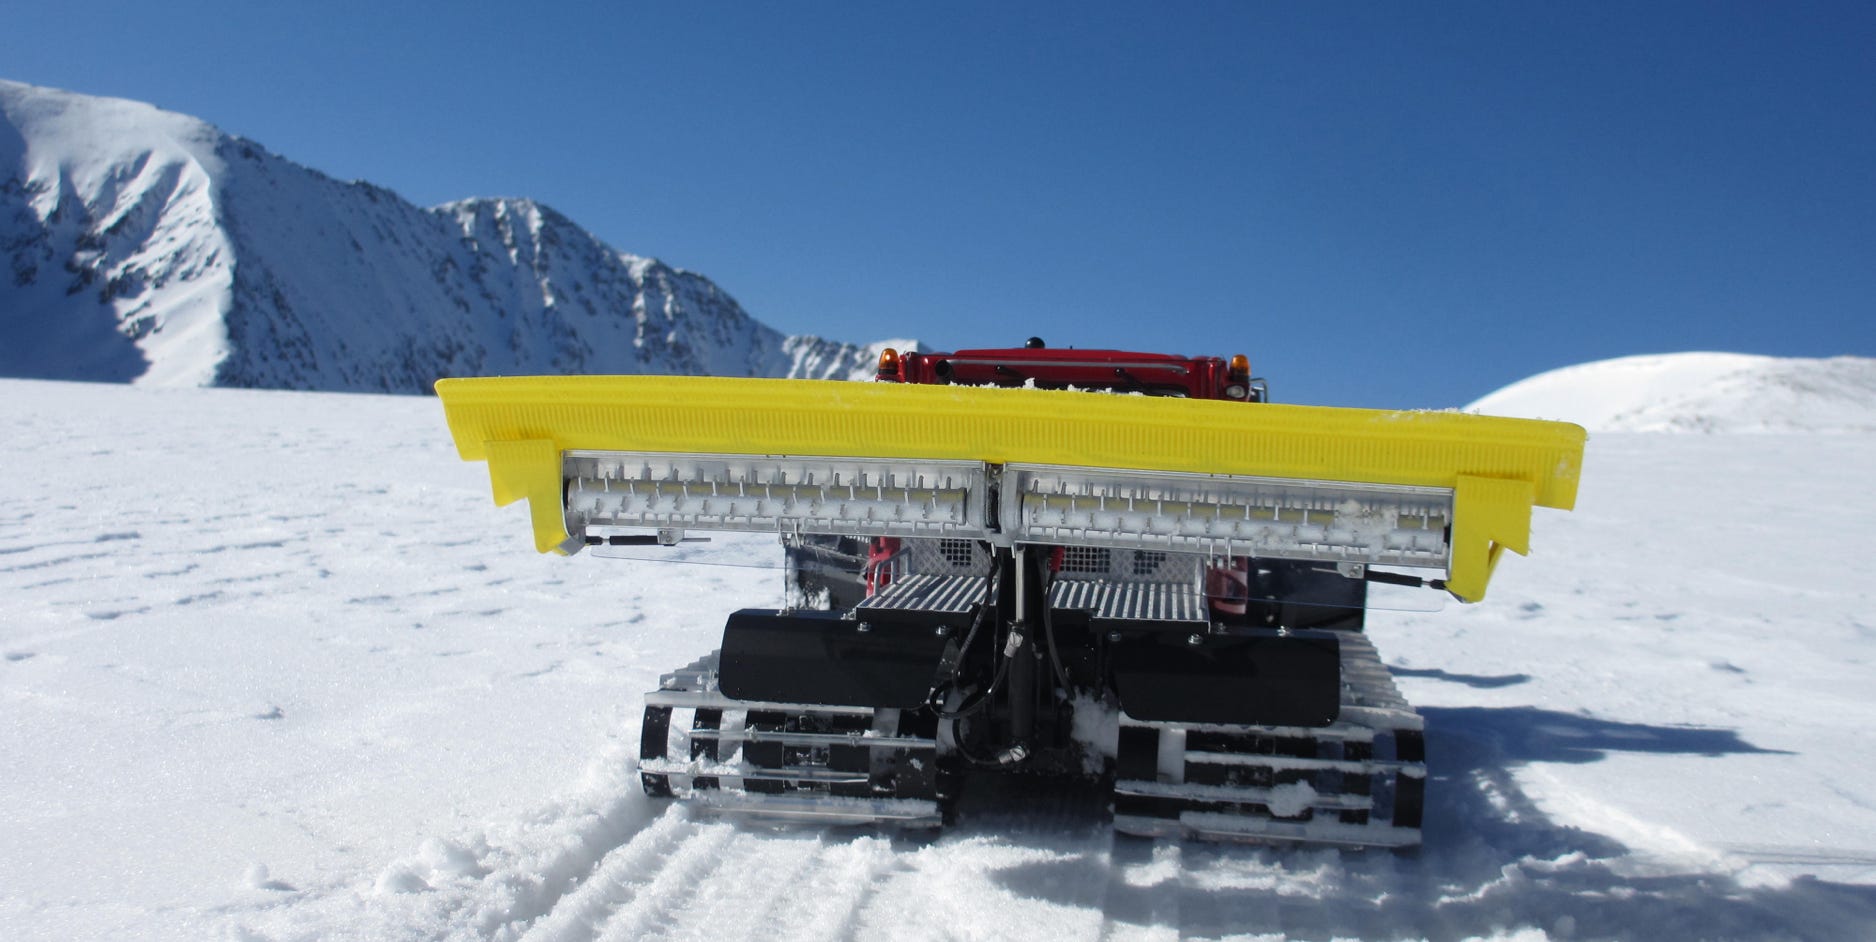
First test run on May 12th, 2016 at the Loveland pass in Colorado on 3,600 m above sea level.
Super-Detailing the Tiller
The Pistenking AFF is already eye candy right out of the box, but additional details can be realized with little effort. This in fact will make it almost undistinguishable from the original. The photos below compare my model with the original. The photos from the original have been kindly provided by Jürgen Pellengahr.
Hydraulics distributor at the model...
... and at the original
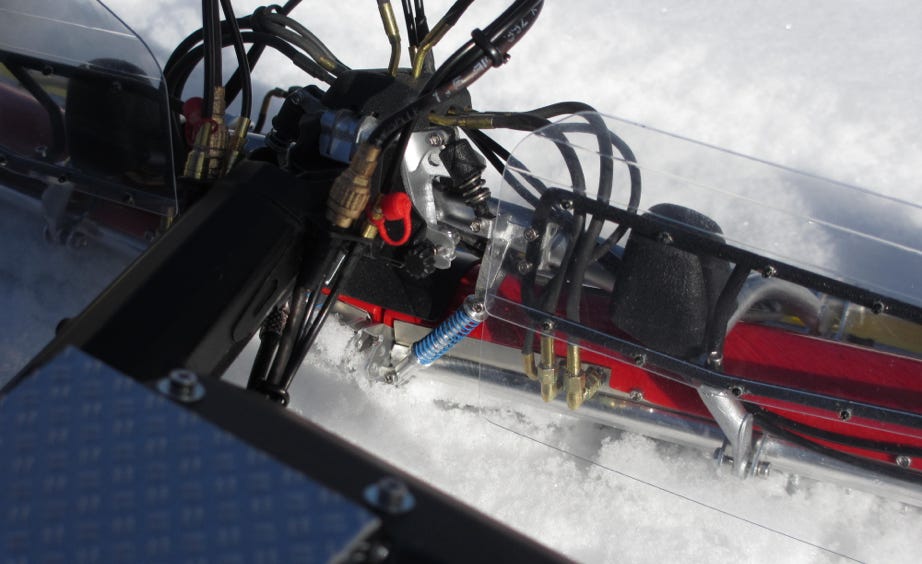
Damper with blue spring at the model...
... and at the original
Side finisher cylinder at the model...
... and at the original
Flap cylinders at the model...
... and at the original
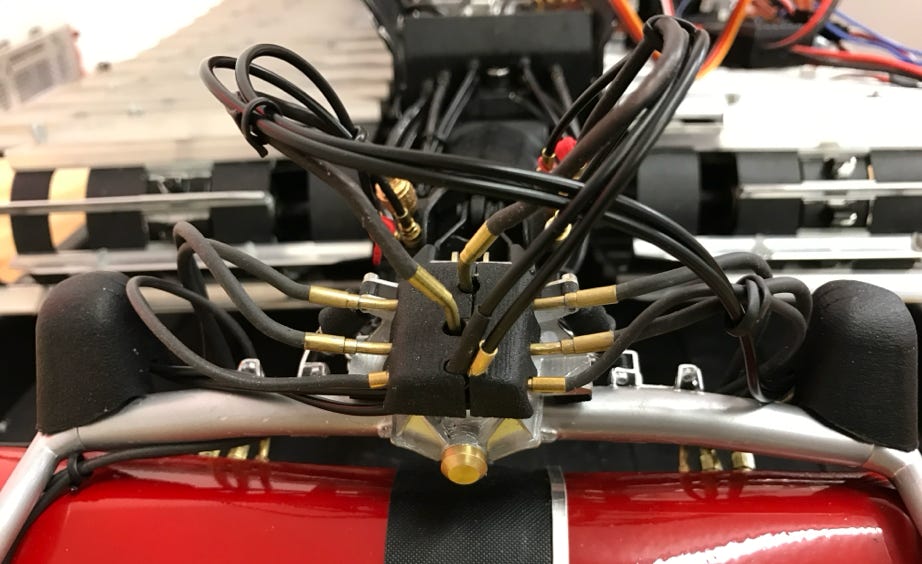
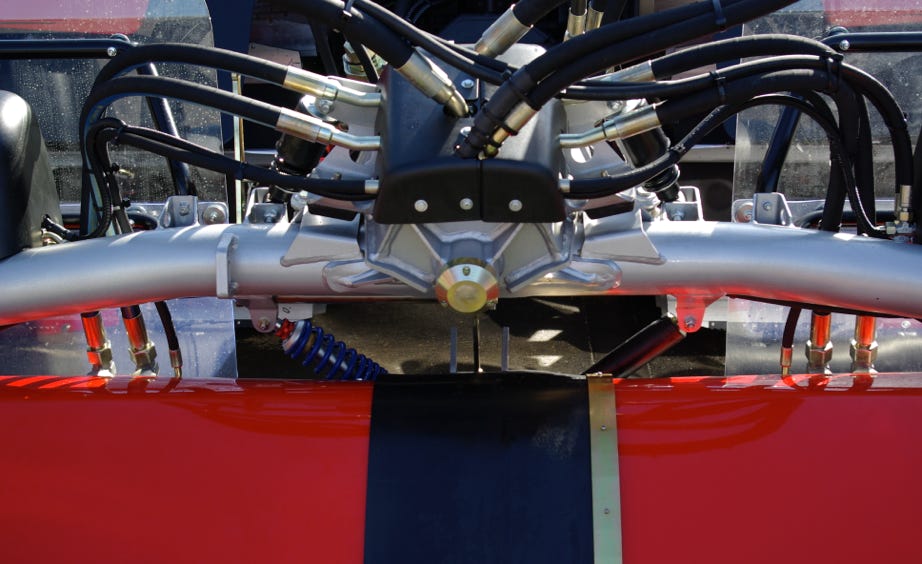
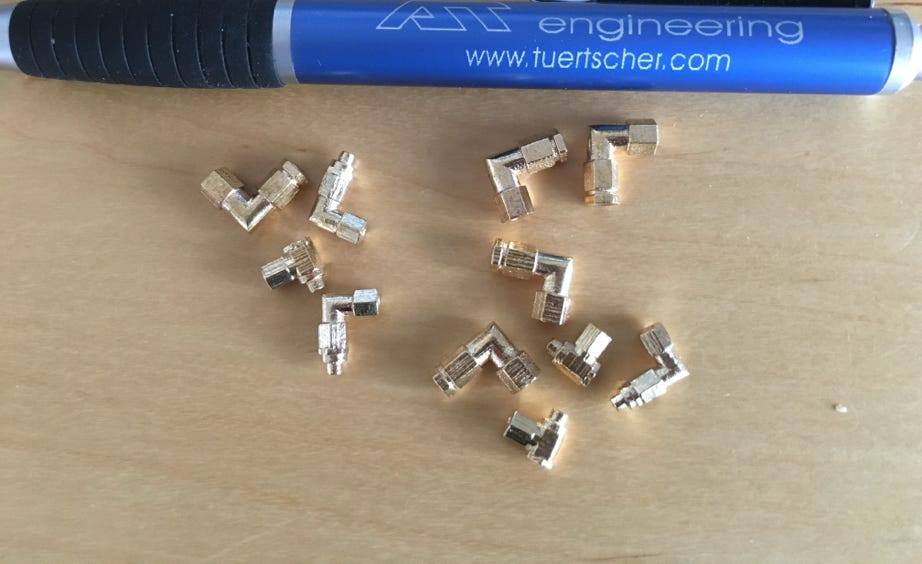
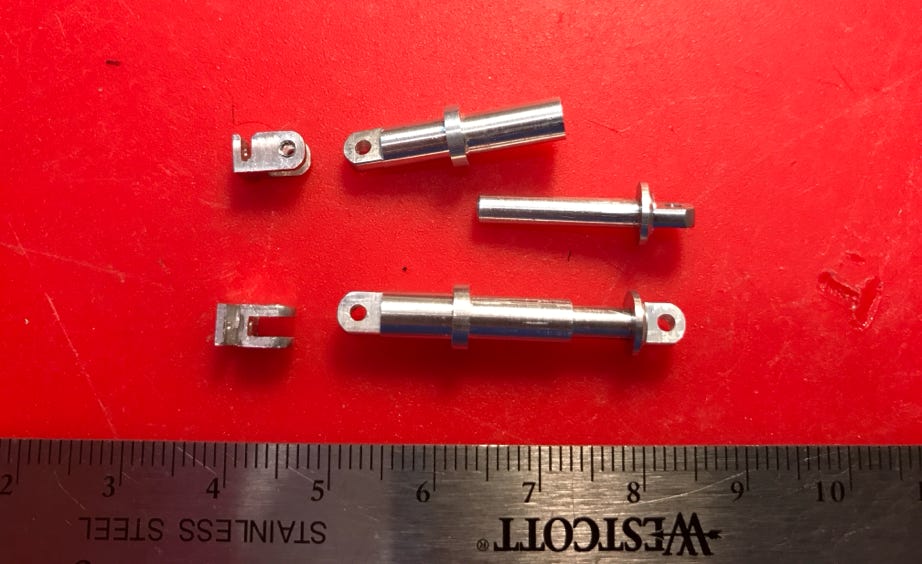
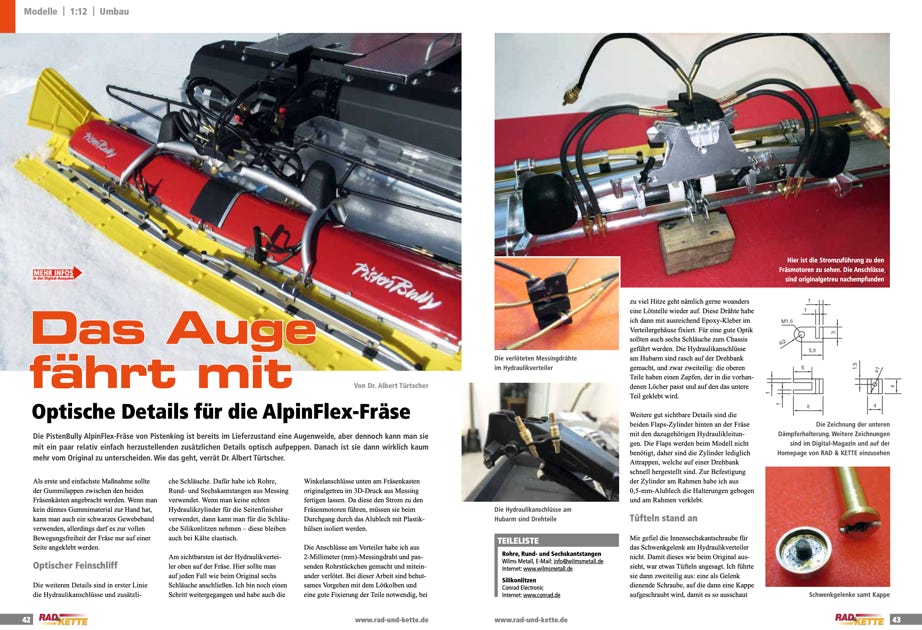
The angled connectors for the hydraulic hoses were made by 3D-printing out of brass. These are first printed in wax, then molded in gypsum and finally casted in brass. This is not really cheap, but the final result makes it worthwhile.
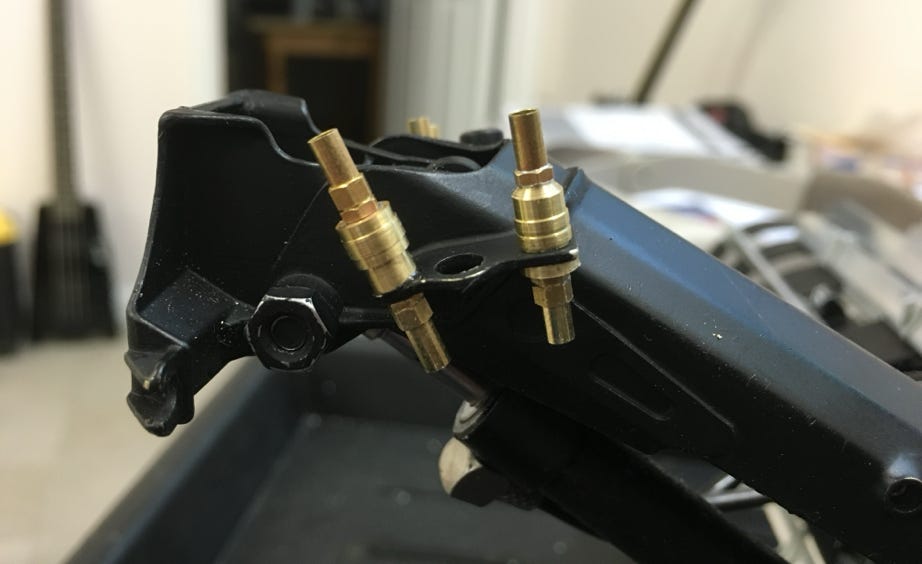
I made the hydraulic connectors on the lifting arm on the lathe, a lower and upper part each, which were then glued into position. They feature a 2 mm bore for routing the hydraulic hoses for the side finishers. I left the electric plugs of Pistenking as they are and painted them golden.
Brass parts (3D printed) for the hydraulic connections
Hydraulic connectors (dummies) at the lifting arm
The motors are connected via the angled connectors on the tiller frame. I soldered a sleeve to the top and a 2 mm brass wire to the bottom. For electrical insulation serve turned black plastic parts. At the hydraulics distributor the connectors are also under current and are made from soldered brass wire and sleeves.
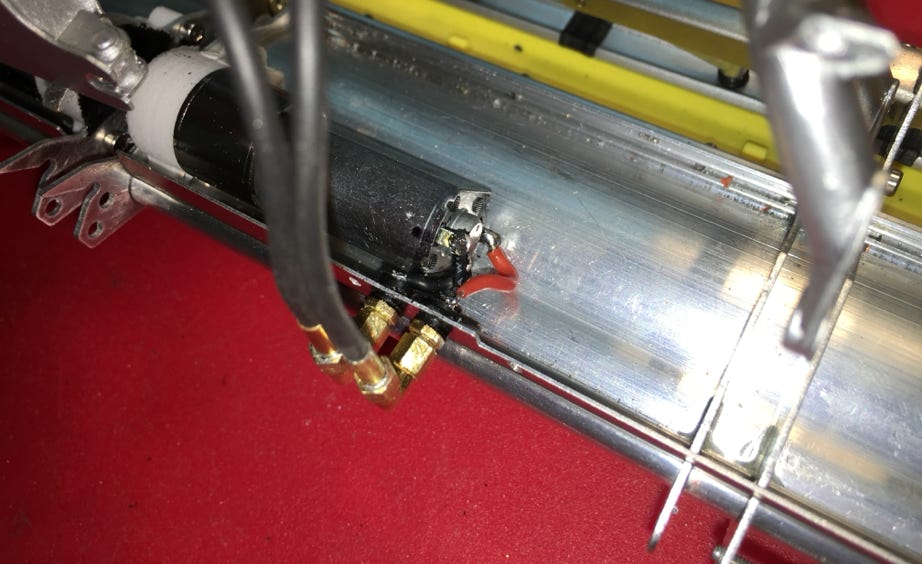
Power supply to the tiller motors
Live "hydraulic hoses" at the hydraulics distributor
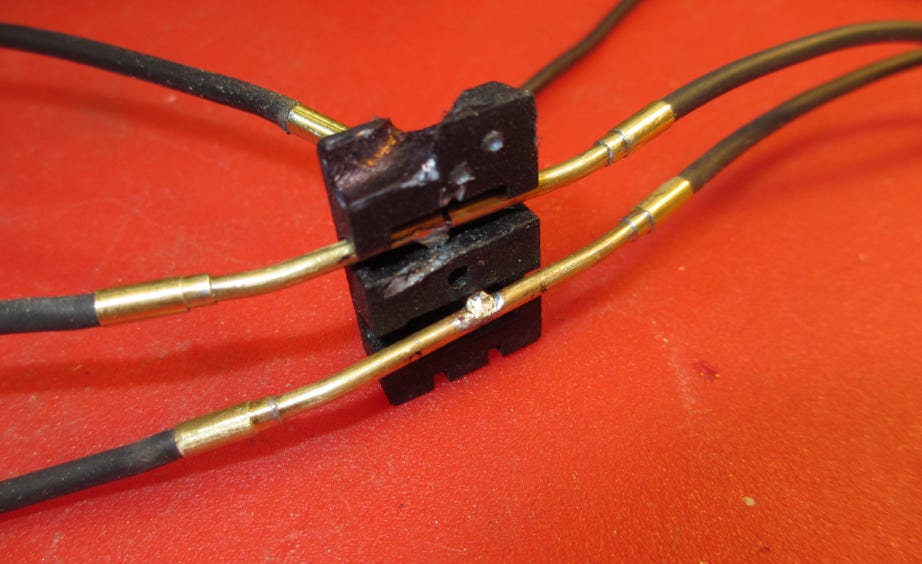
The allen screw which serves as a hinge at the hydraulics distributer does of course not match the original and was replaced. Here some tinkering was necessary, finally I made a screw with cap, see photos. The cap has a soldered-on threaded M2 stub and is screwed on by hand at the end.
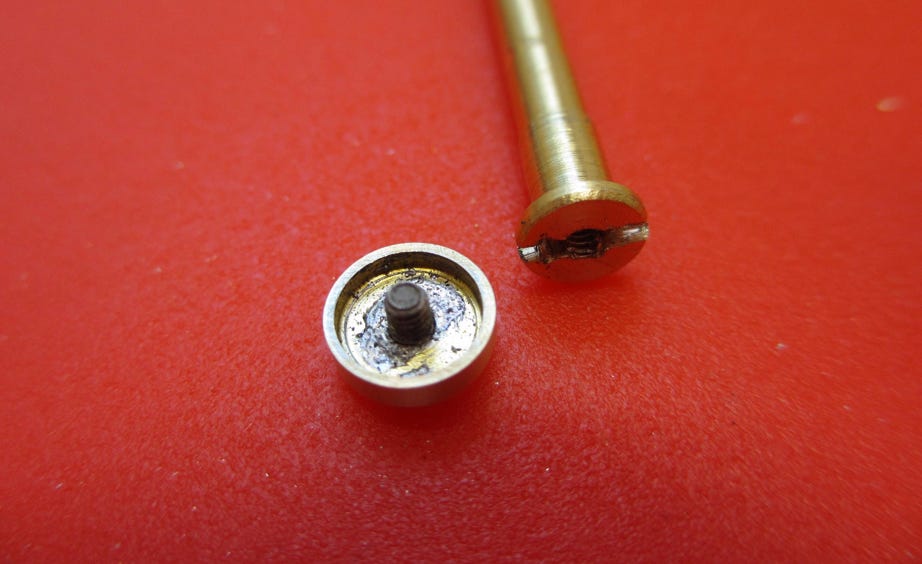
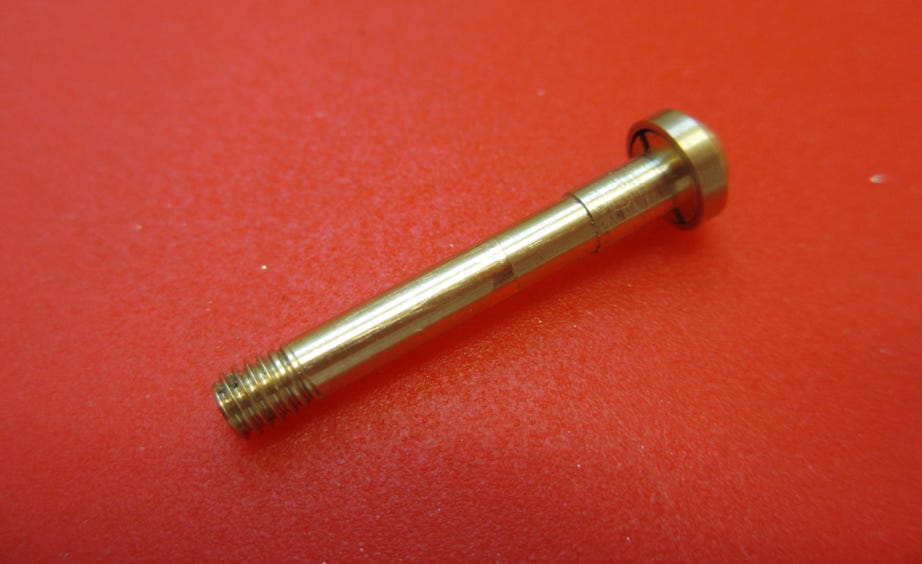
Srew with cap for the hinge...
... and here with attached cap
The cylinders for the flaps are of course only dummies, as the flaps do not make sense with the model. These are made quickly as turned parts with glued on hydraulic connections and silicon wire as hydraulic hoses.
Flap cylinder left...
... and right.
Finallly I made the damper elements for the tiller boxes. The upper mounts already exist at the Pistenking tiller. I made the lower mounts out of aluminum using a file and a saw. I glued them in place and used a 1 mm steel wire peg for safety. It would be too annoying, if one of these tiny parts is lost in deep snow. I tried different springs and it turned out to use a rather soft spring. To match them with the original I dipped them in blue paint.
Parts of the tiller box spring damper elements
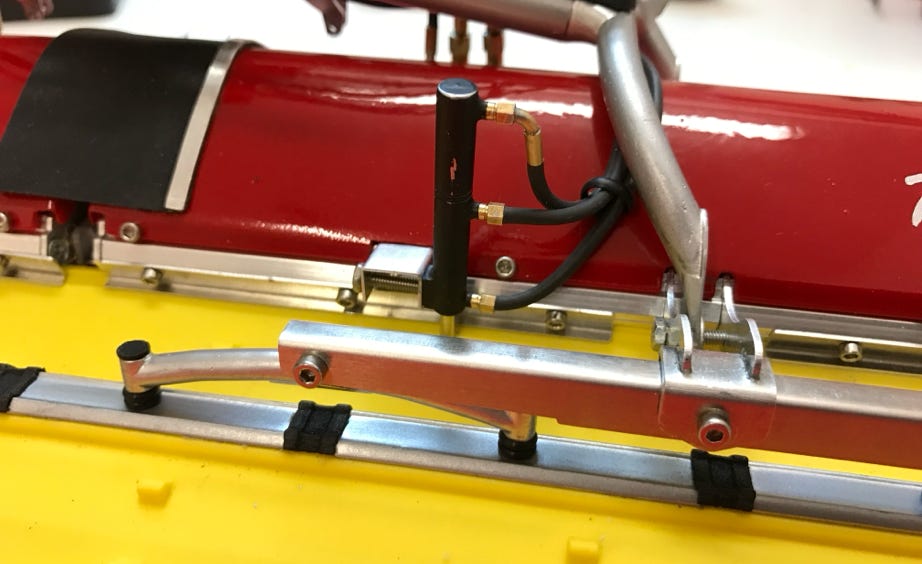
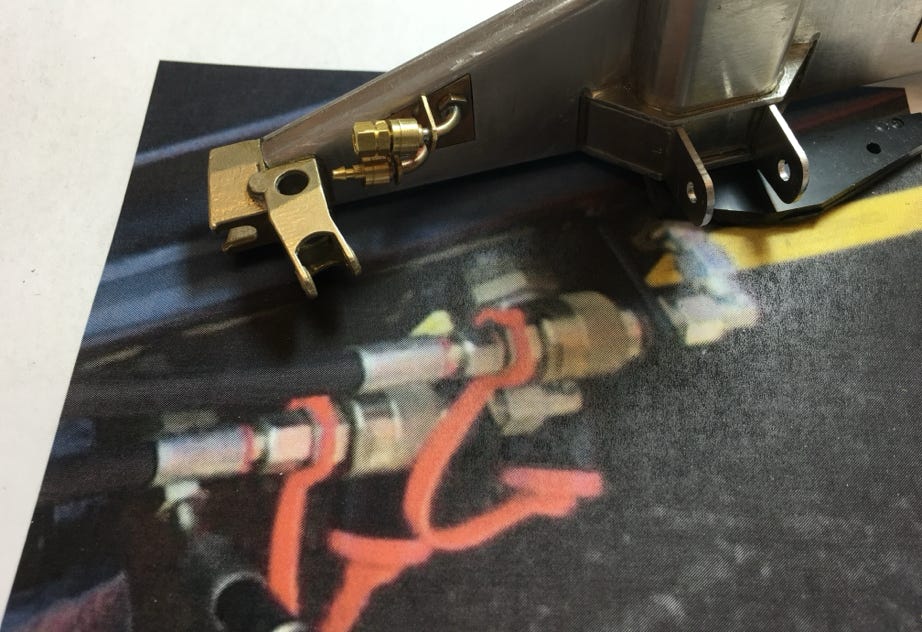
The hydraulic connectors at the chassis tub also match the original as close as possible
Drawings with dimensions of the parts are available as PDF downloads at Know How.
The angled connectors can be ordered at Shapeways in the Shop of AT modellbau.
Note: The angled connectors for the power supply to the motors are to be adapted by yourself with sleeve, wire and drilled holes. 4 pieces are necessary.
The angled connectors for the side finishers are to be drilled and connectors added if they are to be used for self made hydraulic cylinders. One high and one low connector are needed for each cylinder. If they're only attached for optical reasons they're available in plastic, too.
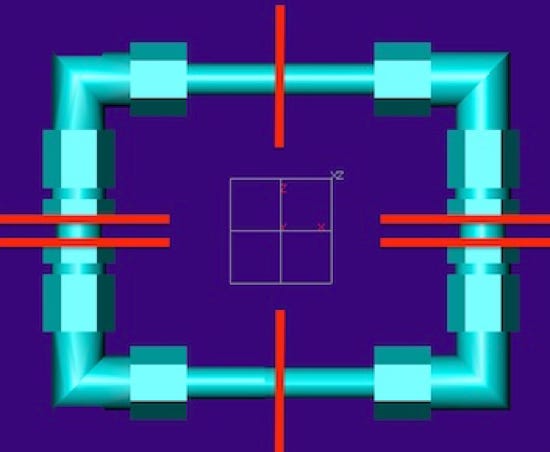
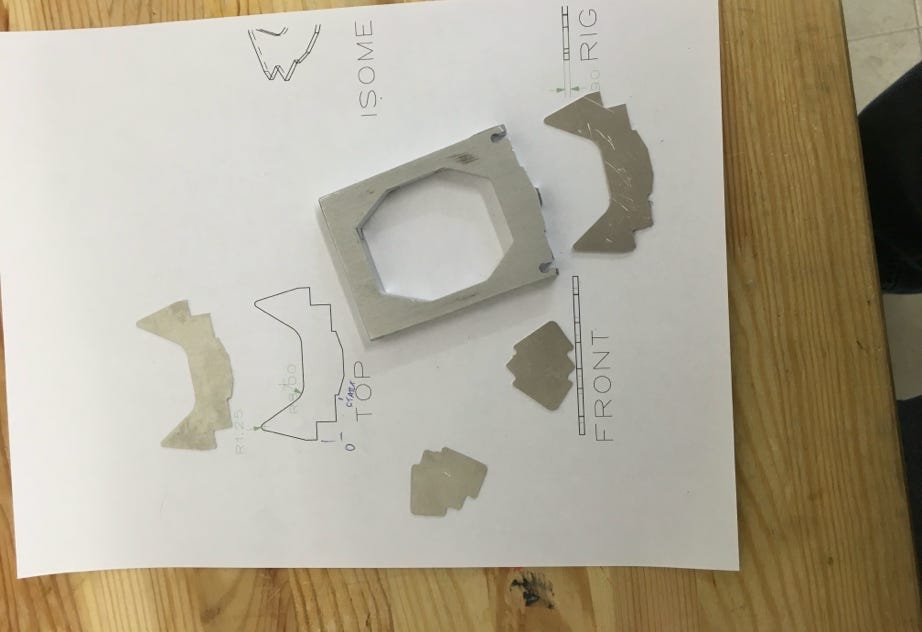
These parts are each combined to a ring which saves significant printing costs, because a mimimal fee is charged for metal parts. The whole ring costs only as much as each individual part would cost. One set is available for all 4 angled connectors, and one set for the side finisher connectors. These have to be cut according to the pictures (red lines):

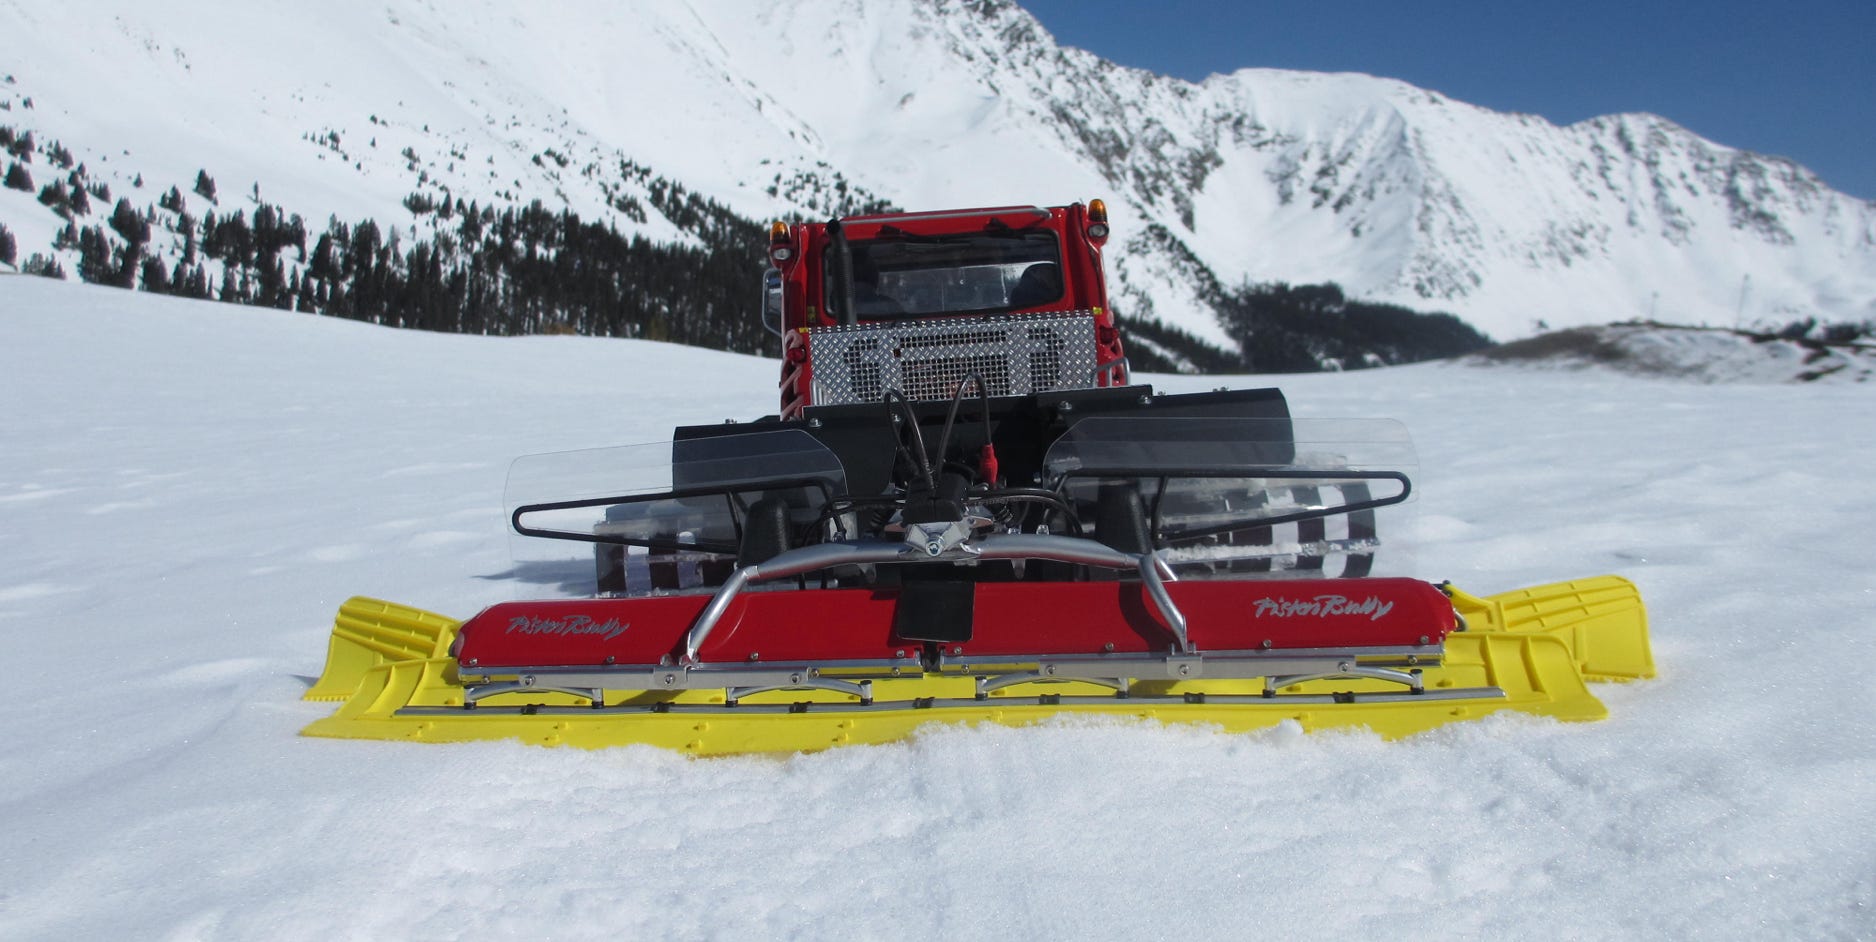
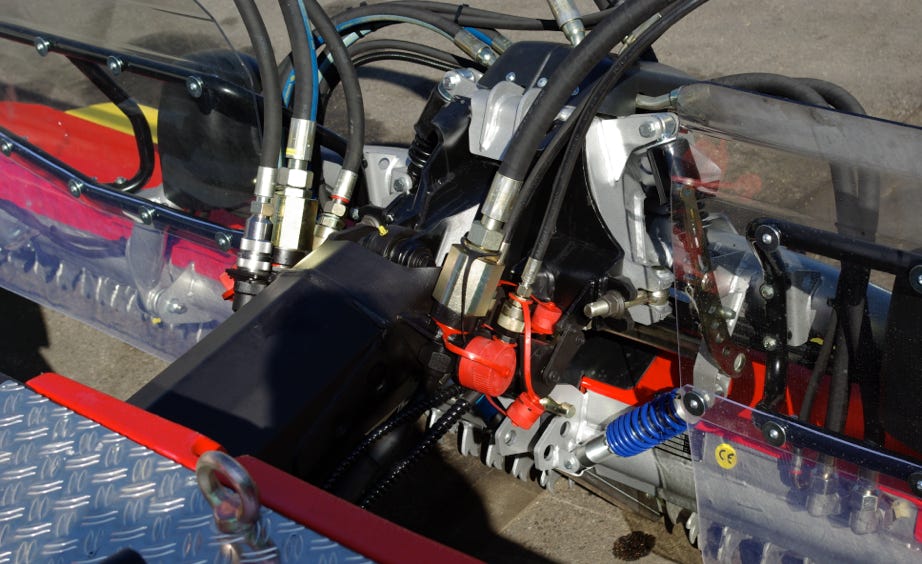
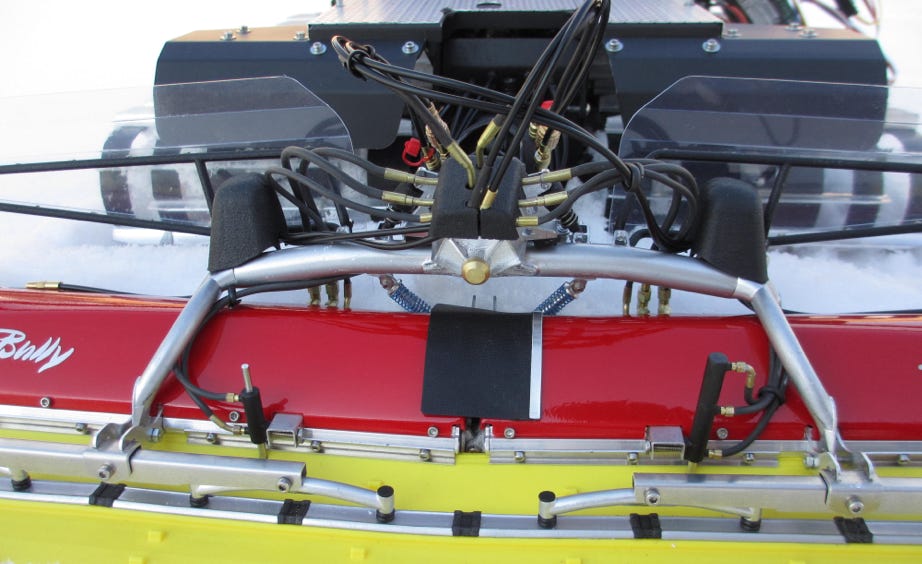
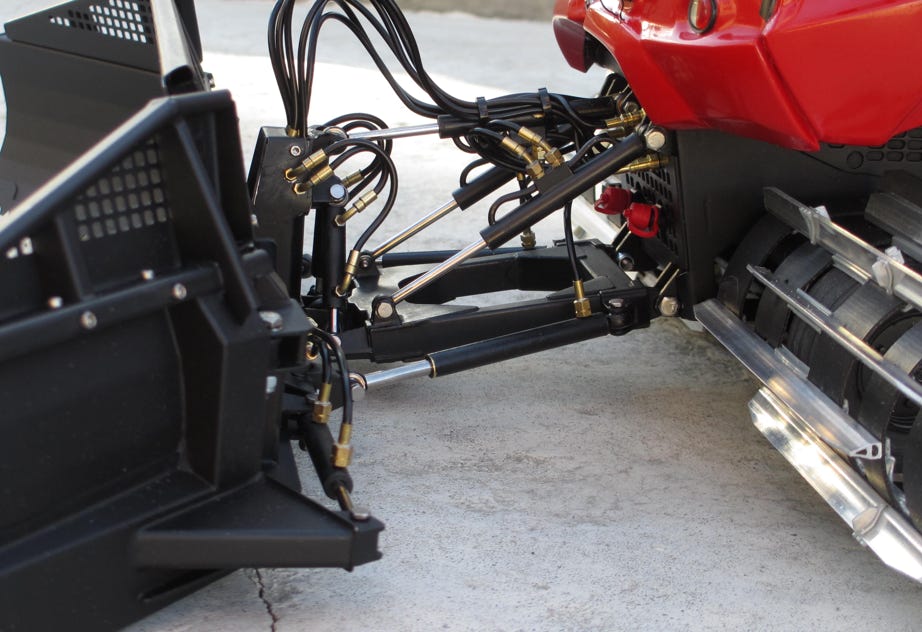
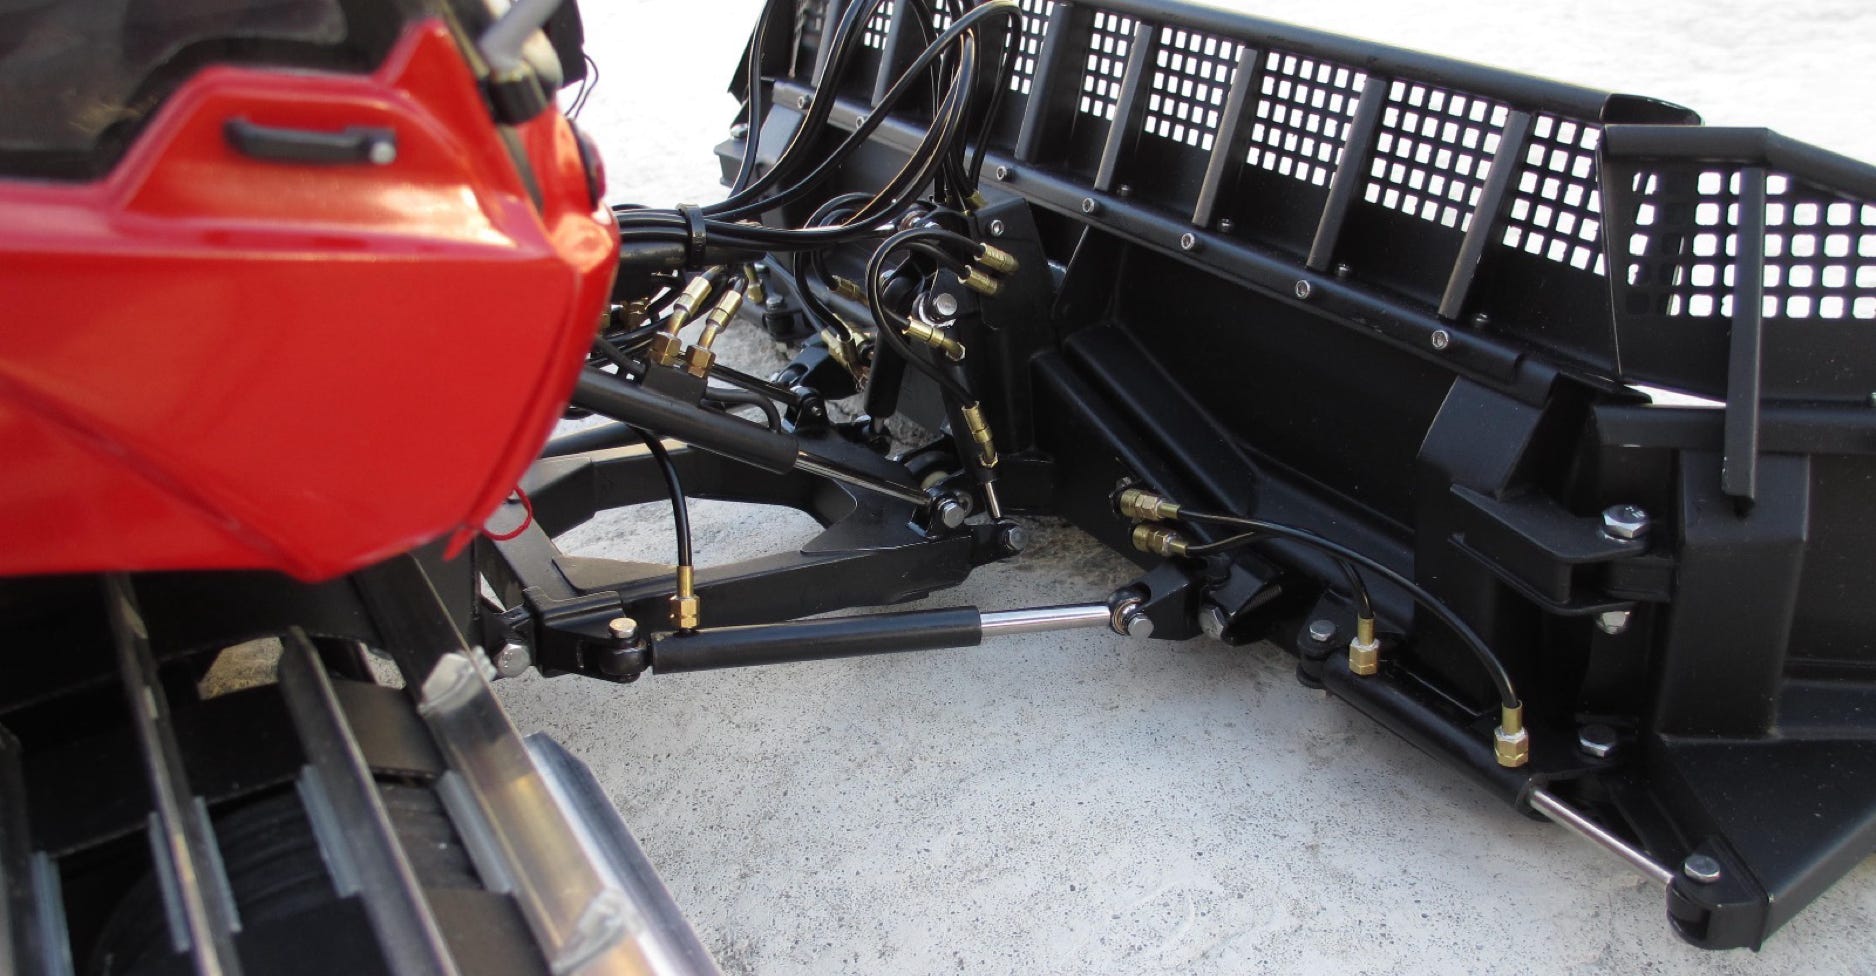
It has been my dream for a long time to build a fully functional snow blade. Although some colleagues prefer mechanical solutions, for me it had to be hydraulics like the original. Besides this seemed to be the easier solution. But unfortunately there are only few hydraulics components for snow cats available on the market in scale 1:12. This led to my decision to manufacture the cylinders myself. More to that can be seen on our hydraulics page.
As the cylinders are matching the original in scale and looks, the hydraulic fittings had to do the same. So I made these elaborately myself as well. A CNC-controlled lathe was indispensable for this task. On the photos some of the fittings can been seen in comparison to the originals. Sure there are compromises to be made in regards to the dimensions of micro hydraulics, but I tried to make these parts as close to the original as possible.

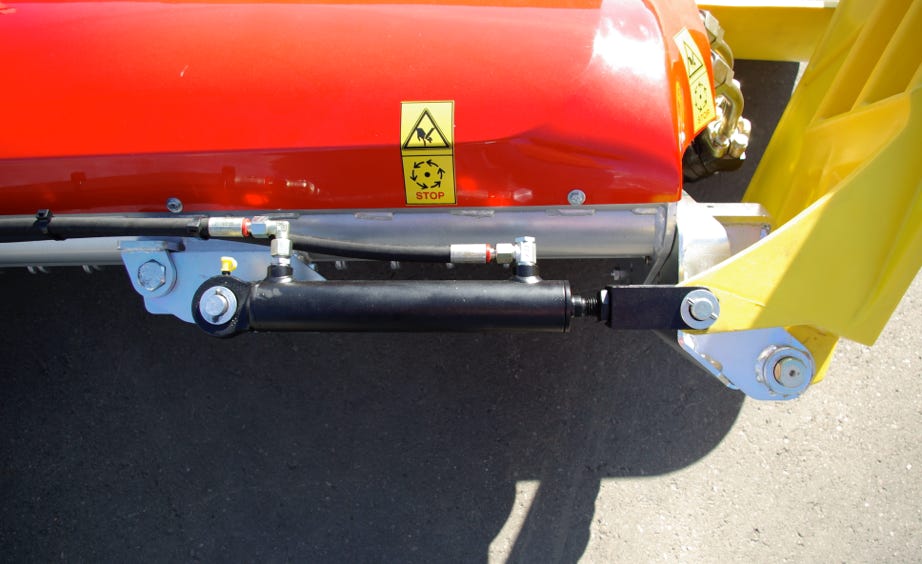
The front equipment carrier is from Pistenking, and I've visually upgraded only the pushing frame with some reinforcement sheets:
The snow blade itself is again from Pistenking. I glued it with UHU plus endfest 300 in the oven at 180°C. A thorough roughening and degreasing of the surface before painting is important. I used sanding wool, acetone and spray can lacquer. As I found out later lacquer withstands the hydraulic oil best, enamel is dissolved by the oil. And oil is unavoidable on these parts!
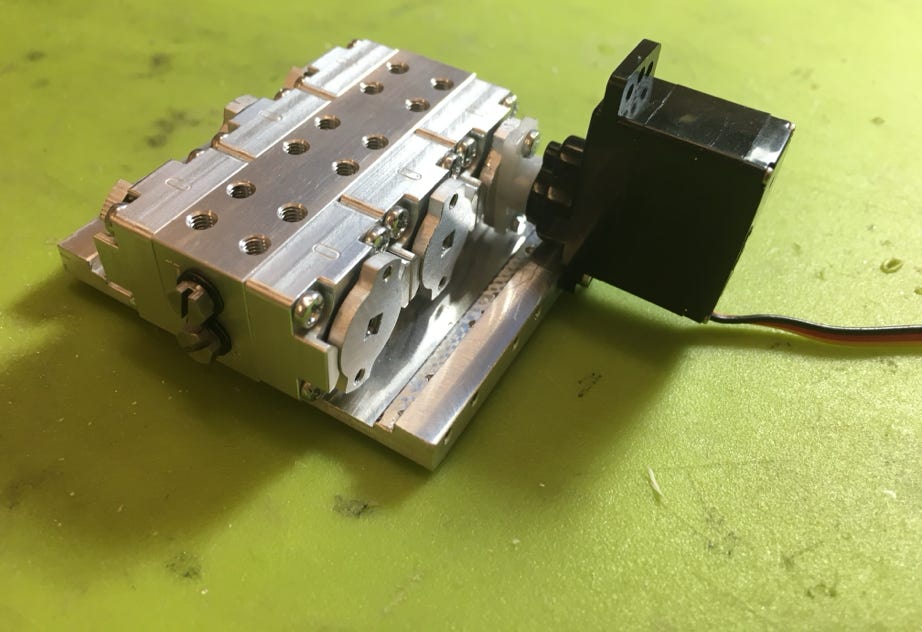
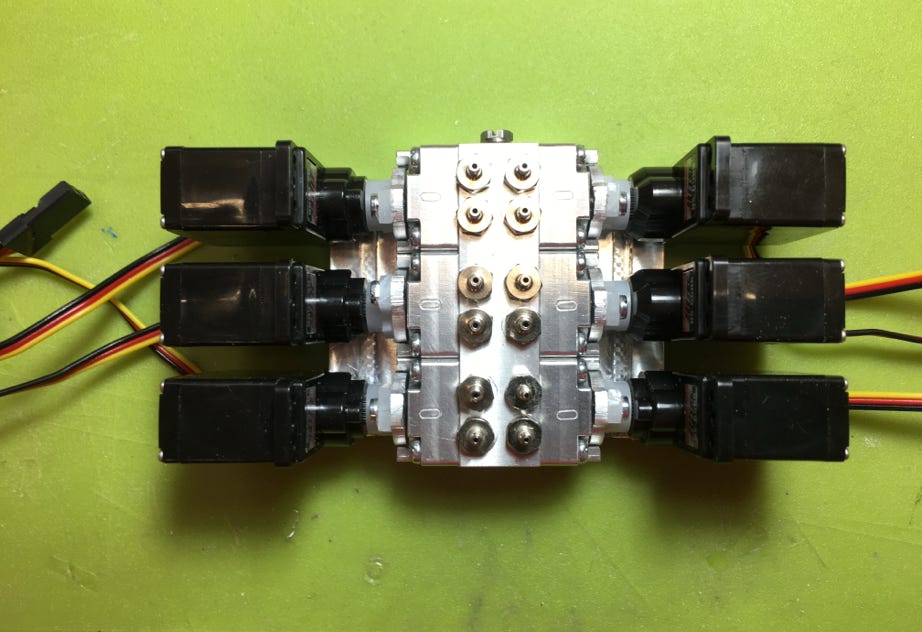
After the equipment carrier and snow blade were both finished I dealt with the actual hydraulic components. The valves are from Modellbau Ulrich Meinhardt, and it was anything but easy to make the fitting servo mounts. This demanded highest precision on the compound table of the Proxxon mill PF230 serving as a drill head.
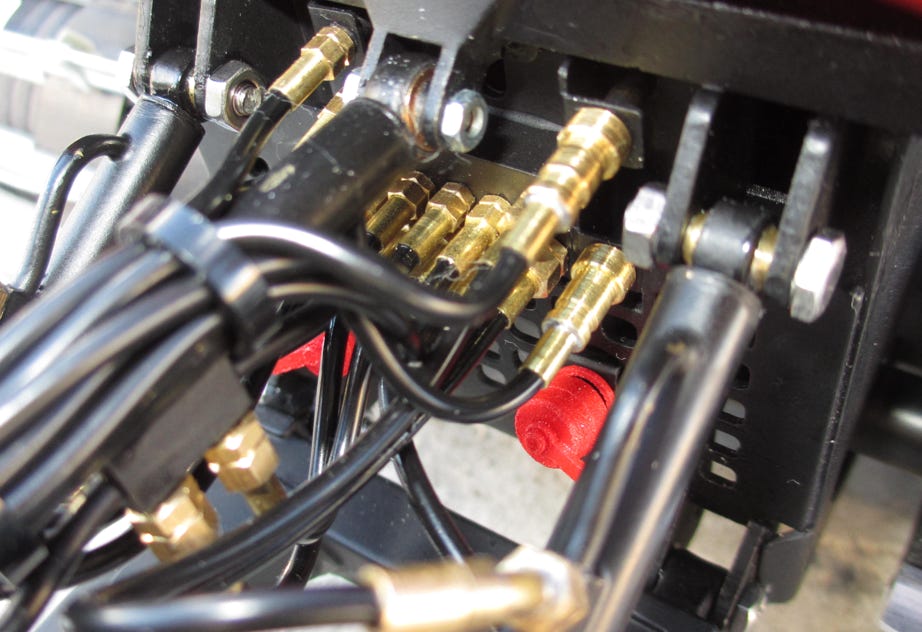
Again the original served as a template for the connection panel for the hydraulic hoses:
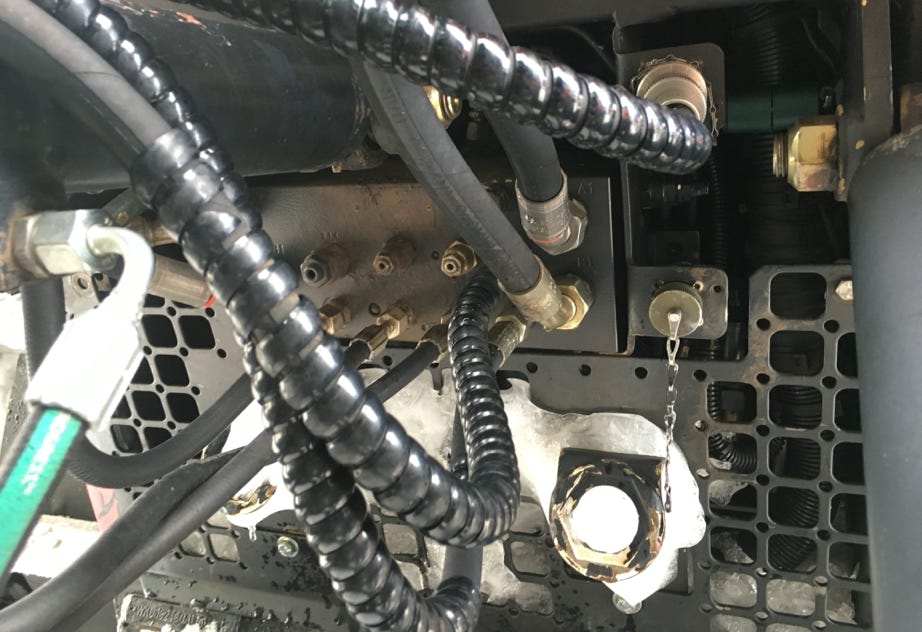
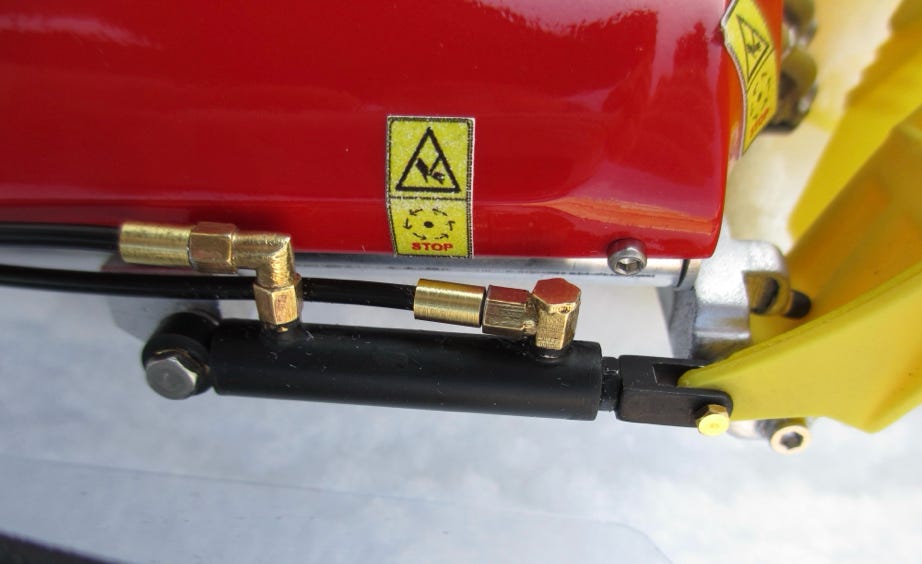
The bracket on the chassis tub for the blade angle cylinder is to small for common ball head connectors. Therefore I made a part with a 5 mm opening.
Finally all the components "just" had to be connected by hoses. I used thin Leimbach hoses with only 1 mm inner diameter because these came closest to the original in this scale. The downside, though, is a pretty high pressure loss. But the installed pump of Modellbau Martin Kampshoff is almost oversized for this model and brings enough performance at a setting of 20 bar.
Connecting the hoses turned out to be quite a work of patience, because the small hoses are not so easy to put over the nipple, and oily fingers do not necessarily make it easier.
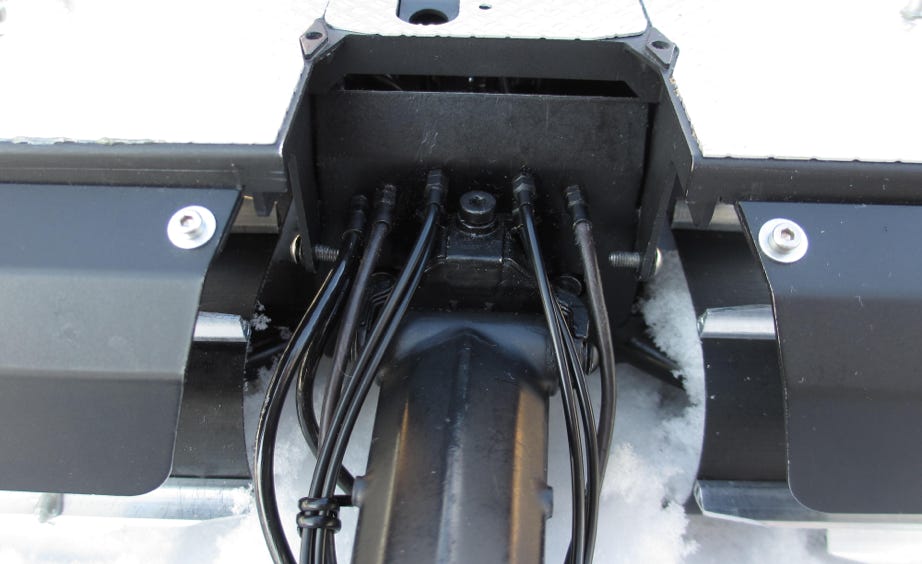
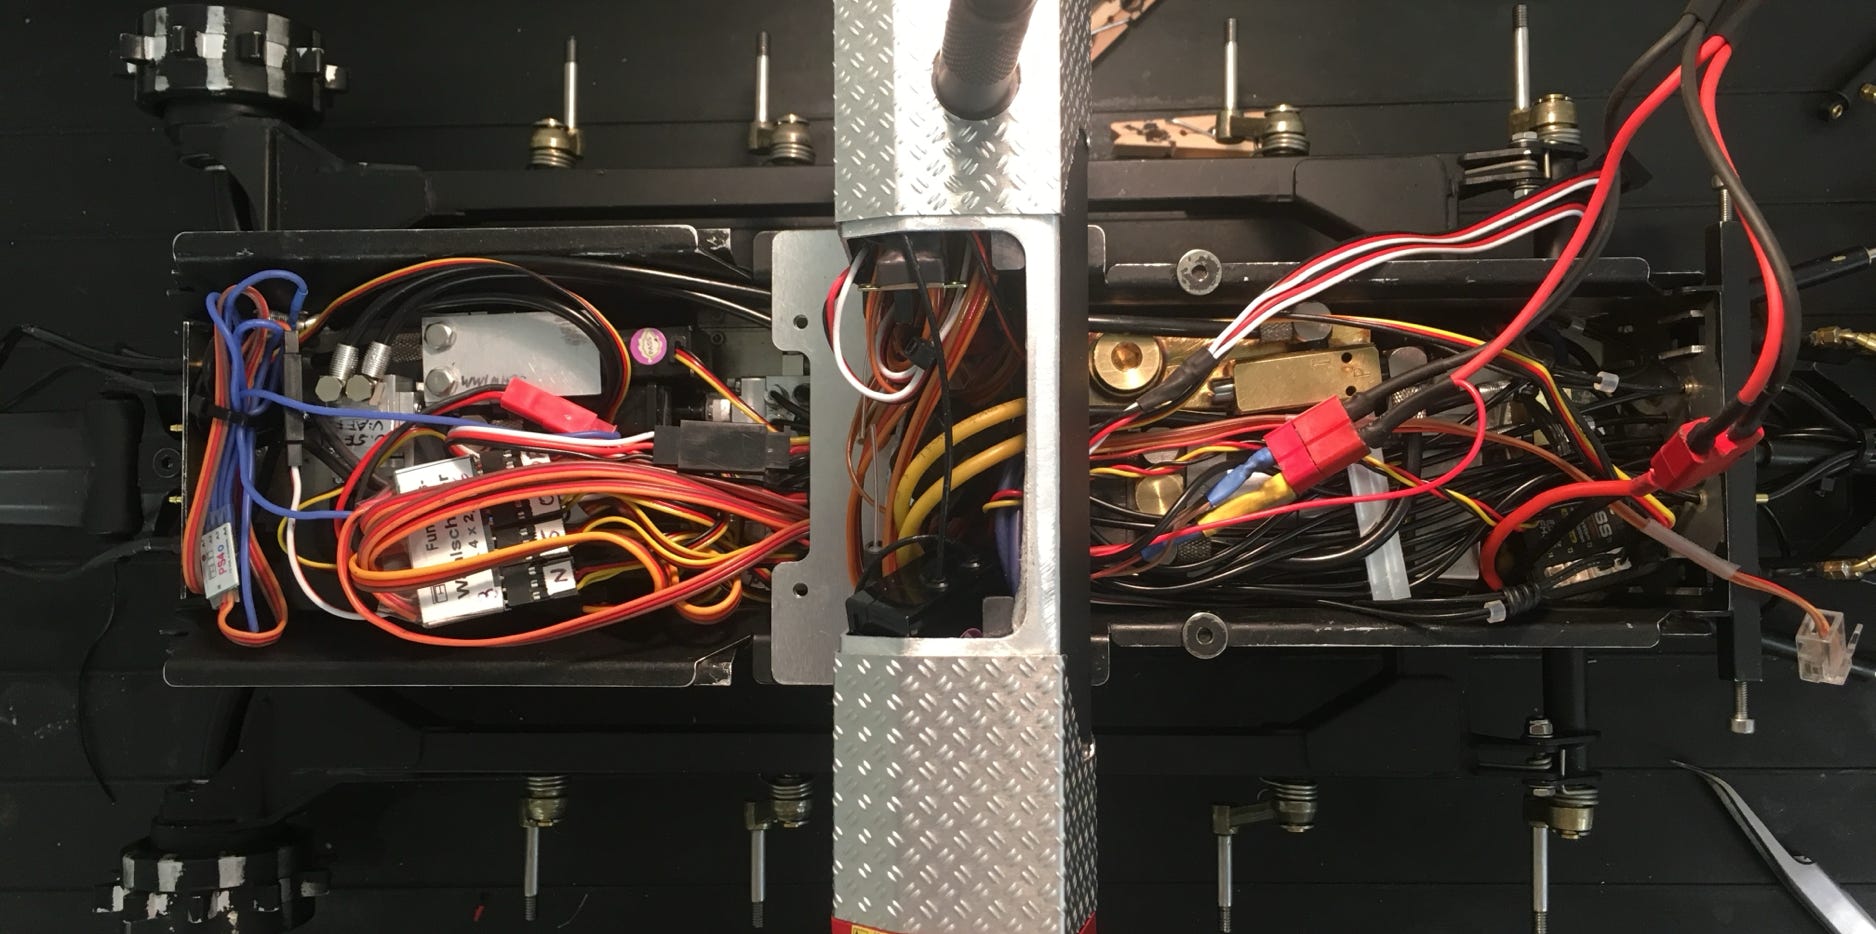
Ultimately there was no space left neither in the chassis tub nor in the back pack. Everything is crammed with hydraulic components and the necessary electronics.
The fully connected equipment carrier does not need to shy away from the comparison with the original. It was quite some effort, with some setbacks and the recognition that model hydraulics are not as easy to implement as initially believed. But the end result justifies the effort, and above all the prospect of having perfect fun when using it in the snow.
Video of the First Functional Tests in Snow
The first test in snow at early May 2016 high up in the Colorado Rocky Mountains was successful:
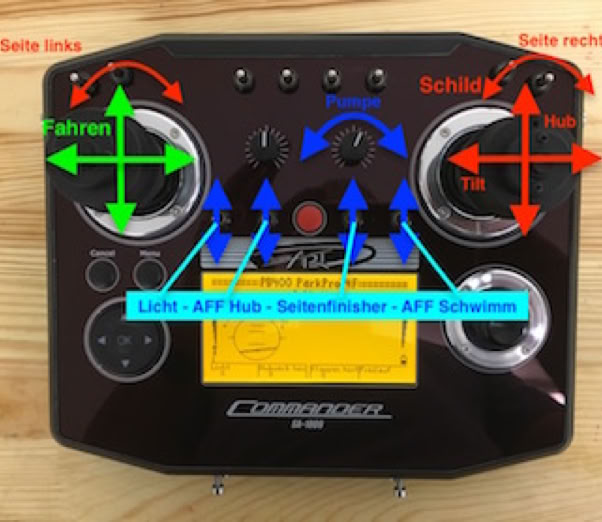
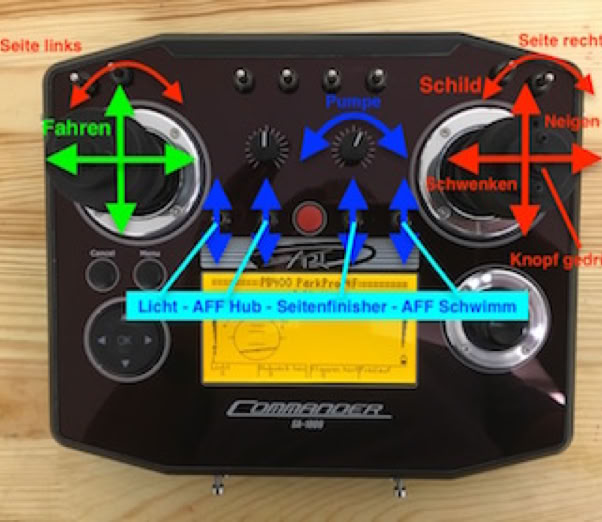
Controlling the many functions demands more channels than a common RC system features, as these are primarily made for airplane models. My first approach was to use my HiTec Aurora 9X with a level switching module. To avoid constant running of the pump I also acquired the Servonaut hydraulics module. But I learned quickly that the servos for the control valves need to be individually adjustable to achieve satisfying hydraulics operations. This is not possible by doubling the channel with the level switching module, because only one setting (neutral position, servo travel) is possible on the transmitter.
So I checked out the specific RC-systems for functional models which are offered by ScaleArt, Servonaut and Blauzahn. The Servonaut was eliminated because it can only handle a maximum of 12 channels, and that is at least 2 too short. Building my own system with Blauzahn seemed too much effort. Thus the ScaleArt Commander SA-1000 (with the CM-5000 receiver) was the only system which met my requirements. It costs quite a bit, but features EVERYTHING (and much more) what is needed.
In addition it offers specific features for hydraulics which made using the level switching module and the pump control module obsolete. After getting familiar with the programming I could individually set-up each valve servo and couple it with the pump control. Operating the snow blade was put on the right control stick just like the original: in normal mode the blade is lifted and tilted, and by pressing the button it can be nicked and rotated. For the side blades I used the rotating function of the 3D-sticks, which is not like the original, but it was obvious in this case. I did not use any levels.
A further advantage is that the Pistenking Kingbus can be connected directly to the receiver. The status of the lights is even shown on the display with symbols. Additionally the battery can be completely monitored via telemetry by default, which is a big advantage to protect the LiFePo-battery. A nice detail is also the position monitor of the snow groomer on the display.
The latest model of the PistenBully 400 series is the low emission version 4F which distinguishes itself by a modified backpack from the regular PB400. The newly designed air intakes are the most striking features of the 4F, alongside the large exhaust pot. As I anyhow planned to convert the PB400 to ParkPro I decided to built the new backpack instead of just simply repainting my model. This is described here in detail: PistenBully 400 ParkPro 4F
Before I did the re-paint to ParkPro the PB400 had a short life as a PB400 4F.
PB400 4F with a very fine detailed backpack
General:
- Scale: 1:12
- Chassis, tracks, equipment carriers, snow blade, tiller by Pistenking
- PB400 body by AT modellbau
- Weight: 5,8 kg (including battery)
Hydraulic Components:
- Motor-Pump-Unit by Modellbau Martin Kampshoff, Robbe brushless motor with Robbe speed controller
- Valves: 6x-valve block, 2x-valve block, single valve (floating position of tiller) by Modellbau Ulrich Meinhardt
- Hoses and fittings by Leimbach, Kampshoff and Robbe
- Hydraulic cylinders: made by myself; except for the tiller lifting cylinder: Robbe
- Current Pump: 4,8 A
- Operating pressure: 20 bar
Electronic Components:
- RC system ScaleArt Commander SA-1000 with CM-5000 receiver
- Double Speed Controller Pistenking
- Servos HiTec HS-65HB for valve blocks (9 pieces)
- Castle Creations CC BEC to supply the tiller wheel motos with 7,2 V
- Battery Turnigy nano-tech LiFePo 4S, 13.2 V, 20C discharge, 2100mAh
- Pistenking Kingbus Universal Module for the lights
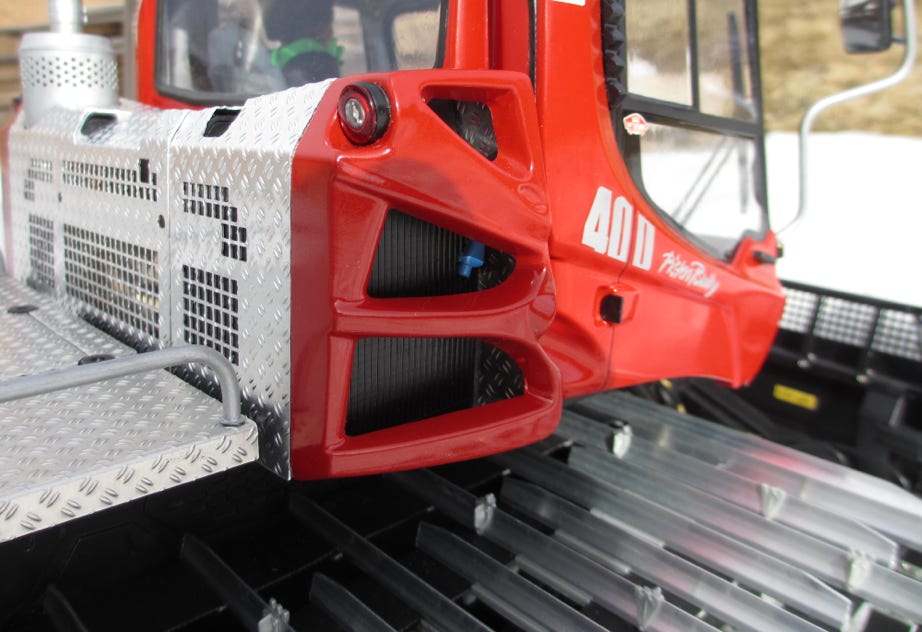
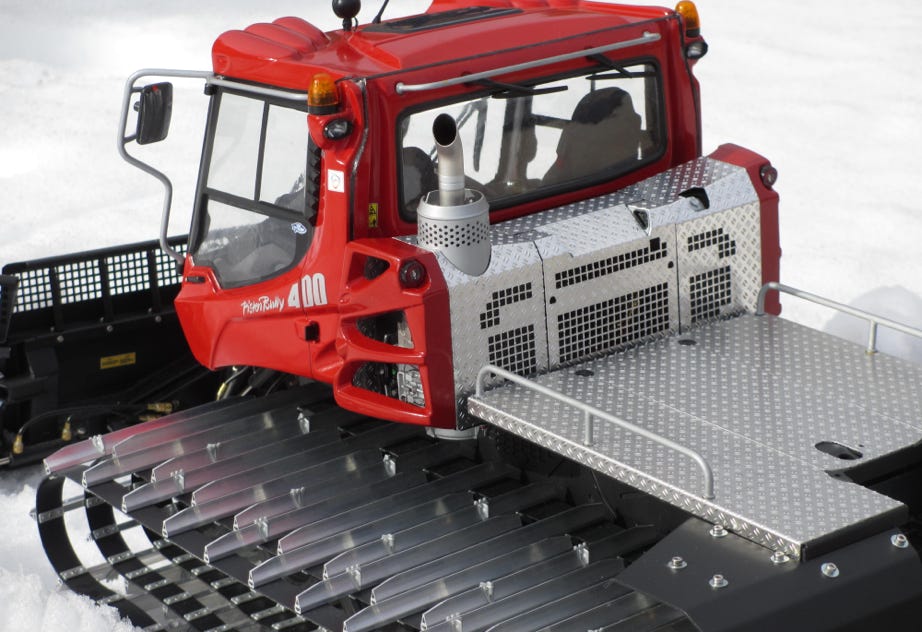
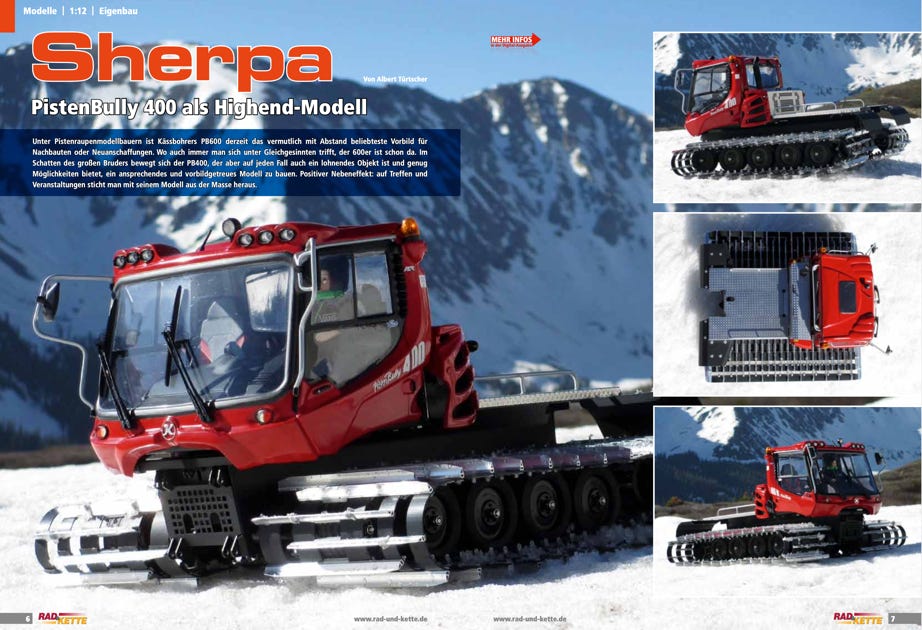
The magazine Rad & Kette 1/2015 issued an article by me about the development and building of the PB400 kit with lots of advices.
I published a detailed test report of the Pistenking AlpinFlex-Tiller in Rad & Kette 4/201. This tiller is installed on the PB400.
The magazine Rad & Kette 1/2017 features an article by me about the development and building of the micro hydraulics for our PB400.
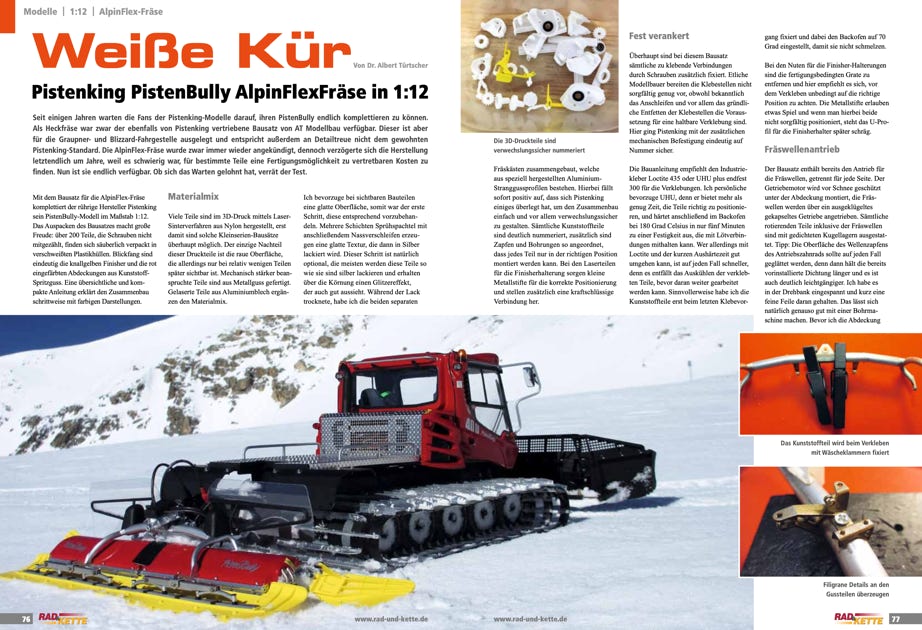
The magazine Rad & Kette 2/2017 features an article by me about upgrading the Pistenking AlpinFlex-Tiller.
All articles are in German.
The articles can be downloaded as PDF file, with friendly permission by the magazine. Just click on the picture for downloading.
Diese Seite verwendet Cookies. Sie stimmen der Verwendung von Cookies durch Anklicken von “OK” zu. Nähere Informationen finden Sie in unseren Datenschutzbestimmungen.
This page is using Cookies. You are permitting the use of cookies by clicking on “OK”. More information can be found at our Privacy Protection.